Hello Readers,
Life has been very busy for me in the last couple of weeks and therefore I have not been posting any new hacks or code. However, the the hacking scene has not gone cold. Lots of stuff has been happening in the blogger hacking space.
1. You might have looked at Ramani's lightining fast Neo template. If not check it out here.
2. Classic Blogger's favorite hacker, Aditya of last word has moved to the new blogger and is now making hack for the new platform. Check out his page here (looks great!).
3. Deepak of Blogger Hacked is spinning out quality Ajax based hacks also displaying strong coding skills. I highly recommend checking out his hacks.
That's what I have noticed recently. Hope this keeps you busy for sometime! Happy hacking and a very happy 2007.
Sunday, December 31, 2006
Sunday, December 24, 2006
Tamed rounders template now hacked and downloadable
Hello all,
Deniz of imessengr has taken the three column rounders template and hacked it to include most of the popular hacks currently available for the new Blogger. He has done this for all the variants of rounders that are available on Blogger.
Visit here to download this template and install it in your blog.
Thursday, December 21, 2006
Blogger Feature or Bug: Edit link disappears and Blog unable to recognize its admin
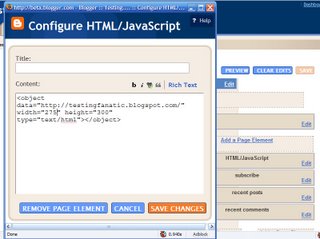
For quite a while now I have been facing problems with my Blogger blogs and layout editor. Every time I edit a widget and save the changes the edit link for that widget disappears from the layout. To understand what I am referring to have a look at the two images below.


Once I update the "Subscribe | Syndicate | Bookmark" widget the edit link disappears. I actually have to click on the page elements link to reload the layout editor which is very irritating. I have not heard anyone else complain about this so I wonder if only I am facing this problem or if this is some cool new Blogger feature that I don't understand :)
Not just this, for some strange reason, my blogs don't identify me as the administrator even if I am logged into blogger. There is a possibility that the widget quickedit links are not shown as I might have messed up some code in the template. But that's not the case as I don't get to see those links even in any new blogs (where the HTML has not been touched) created by me. Anyone else facing this problem? Anyone has any suggestions?
Wednesday, December 20, 2006
Blogger News: Welcome the "New Blogger"
Hello Readers,
Just a quick update here. Blogger has announced that they are now out of beta. This is shown by the change of URLs. The sign-in link on beta blog navbars no longer points to the beta.blogger.com link. It now points to www2.blogger.com.
Classic Blogger users can learn more aboutBlogger Beta the New Blogger here.
Just a quick update here. Blogger has announced that they are now out of beta. This is shown by the change of URLs. The sign-in link on beta blog navbars no longer points to the beta.blogger.com link. It now points to www2.blogger.com.
Classic Blogger users can learn more about
Saturday, December 16, 2006
Adsense inside your posts and only on post (item) pages
Loui$$ from Blogging Secret just asked me how I was displaying adsense ads only on post (item) pages and inside the post i.e. in the beginning and the end of each post. For this I use the same if statements from my hack Display widgets only on pages you prefer but widget are not involved in this one as widgets cannot go inside a post.
First let me acknowledge the sources from which I learnt some essential adsense tricks for Blogger Beta:
1. Using adsense code in beta template by Loui$$.
2. Using adsense in posts by Deniz.
I recommend checking those out before proceeding with this hack. As always, please back-up your template before proceeding with this hack as you will be modifying some important portions of your template. Now for the hack. Simply look for:
<p><data:post.body/></p>
in your template's <div class='post'> section and replace it with the code given in code boxes below:
([Your Adsense] in the each of codes given below must be replaced with the adsense code of your choice)
1. This code:
(if you are not using any hacks like peek-a-boo posts, selective expandable posts or peek-a-boo on label, archive and search pages)
2. This code in bold-italic (If you are using Peek-a-boo posts hacks)
(If you are also using the peek-a-boo on label and search pages hack, then there may be some confusion regarding which <p><data:post.body/></p> must be replaced with the code given below. Therefore, I have included the peek-a-boo code as well so that you can easily locate the correct instance of data:post.body/ in your template.)
3. This code in bold-italic (If you are using selective expandable posts hack)
Hope this becomes the tipping point in your adsense revenues graph :D
First let me acknowledge the sources from which I learnt some essential adsense tricks for Blogger Beta:
1. Using adsense code in beta template by Loui$$.
2. Using adsense in posts by Deniz.
I recommend checking those out before proceeding with this hack. As always, please back-up your template before proceeding with this hack as you will be modifying some important portions of your template. Now for the hack. Simply look for:
<p><data:post.body/></p>
in your template's <div class='post'> section and replace it with the code given in code boxes below:
([Your Adsense] in the each of codes given below must be replaced with the adsense code of your choice)
1. This code:
(if you are not using any hacks like peek-a-boo posts, selective expandable posts or peek-a-boo on label, archive and search pages)
      <b:if cond='data:blog.pageType == "item"'>
        <p><table align='center'><tr><td>
<center>[Your Adsense]</center></td></tr></table>
<data:post.body/><table align='center'><tr><td>
<center>[Your Adsense]</center></td></tr></table></p>
      <b:else/>
<p><data:post.body/></p>
      </b:if>
2. This code in bold-italic (If you are using Peek-a-boo posts hacks)
(If you are also using the peek-a-boo on label and search pages hack, then there may be some confusion regarding which <p><data:post.body/></p> must be replaced with the code given below. Therefore, I have included the peek-a-boo code as well so that you can easily locate the correct instance of data:post.body/ in your template.)
<div class='post-body' expr:id='"post-" + data:post.id'>
<b:if cond='data:blog.pageType == "item"'>
<p><table align='center'><tr><td>
<center>Your Adsense</center></td></tr></table>
<data:post.body/><table align='center'><tr><td>
<center>Your Adsense</center></td></tr></table></p>
<b:else/>
<style>#fullpost {display:none;}</style>
<p><data:post.body/></p>
<span id='showlink'>
<p><a expr:onclick='"javascript:showFull(\"post-" + data:post.id + "\");"' href='javascript:void(0);'>Continue reading...</a></p>
</span>
<span id='hidelink' style='display:none'>
<p><a expr:onclick='"javascript:hideFull(\"post-" + data:post.id + "\");"' href='javascript:void(0);'>Excerpts only...</a></p>
</span>
<script type='text/javascript'>checkFull("post-" + "<data:post.id/>")</script>
</b:if>
<div style='clear: both;'/> <!-- clear for photos floats -->
</div>
3. This code in bold-italic (If you are using selective expandable posts hack)
<div class='post-body' expr:id='"post-" + data:post.id'>
<b:if cond='data:blog.pageType == "item"'>
<style>#fullpost{display:inline;}</style>
<p><table align='center'><tr><td>
<center>[Your Adsense]</center></td></tr></table>
<data:post.body/><br/>
<table align='center'><tr><td><center>
[Your Adsense]</center></td></tr></table></p>
<b:else/>
<style>#fullpost{display:none;}</style>
<p><data:post.body/></p>
<span id='showlink'>
<a expr:href='data:post.url'>Read More......</a>
</span>
<script type='text/javascript'>
checkFull("post-" + "<data:post.id/>");
</script>
</b:if>
<div style='clear: both;'/> <!-- clear for photos floats -->
</div>
Hope this becomes the tipping point in your adsense revenues graph :D
Friday, December 15, 2006
Add background colors to comments
Hi all,
This is a quick & dirty or a simple hack (if you want to call it that) that allows one to add a background color to the comments. I have this set in my blog and you can simply check the post page for one of my posts that has comments to see what I am talking about. Here is an image for your convenience:

Interested? Please backup your template before proceeding with this hack.
In this hack you can assign a different background color (and text color) for the blog author’s comments (see the image above) and to do this you must have this Hack (Author comment highlighting) from Hackosphere installed.
Once you install the author comment highlighting hack from Hackosphere, your comment code will look similar to this:
Now check out this modified code. As the comment section CSS may differ across various templates, do not copy-paste the entire code. Understand and pick up the changes shown in italic-bold (and annotated for reference). Also Checkout the image below to see what I mean by comment header, comment body and comment footer in my annotations.

To pick up color hex values that suit your blog you can refer to this link. This is a simple tutorial on how to modify your comment section. You can add a whole lot of CSS to make it look better. Do drop a line here if you are able to create anything good looking based on these lines.
This is a quick & dirty or a simple hack (if you want to call it that) that allows one to add a background color to the comments. I have this set in my blog and you can simply check the post page for one of my posts that has comments to see what I am talking about. Here is an image for your convenience:

Interested? Please backup your template before proceeding with this hack.
In this hack you can assign a different background color (and text color) for the blog author’s comments (see the image above) and to do this you must have this Hack (Author comment highlighting) from Hackosphere installed.
Once you install the author comment highlighting hack from Hackosphere, your comment code will look similar to this:
/* Comments
----------------------------------------------- */
#comments {
 margin:0;
 }
#comments h4 {
 margin:0 0 10px;
 border-top:1px dotted $borderColor;
 padding-top:.5em;
 line-height: 1.4em;
 font: bold 110% Georgia,Serif;
 color:#333;
 }
#comments-block {
 line-height:1.6em;
 }
.comment-author {
 background:url("http://www.blogblog.com/dots/icon_comment.gif") no-repeat 2px .35em;
 margin:.5em 0 0;
 padding:0 0 0 20px;
 font-weight:bold;
 }
.comment-body {
 margin:0;
 padding:0 0 0 20px;
 }
.comment-body p {
 margin:0 0 .5em;
 }
.comment-body-author {
 margin:0;
 padding:0px 0px 0px 20px;
}
.comment-body-author p {
 font-size:100%;
 margin:0 0 .2em 0;
 color:#000000;
 text-decoration:bold;
}
.comment-footer {
 margin:0 0 .5em;
 padding:0 0 .75em 20px;
 color:#996;
 }
.comment-footer a:link {
 color:#996;
 }
.deleted-comment {
 font-style:italic;
 color:gray;
 }
Now check out this modified code. As the comment section CSS may differ across various templates, do not copy-paste the entire code. Understand and pick up the changes shown in italic-bold (and annotated for reference). Also Checkout the image below to see what I mean by comment header, comment body and comment footer in my annotations.
/* Comments
----------------------------------------------- */
#comments {
 margin:0;
 }
#comments h4 {
 margin:0 0 10px;
 border-top:1px dotted #99bb99;
 padding-top:.5em;
 line-height: 1.4em;
 font: bold 110% Georgia,Serif;
 color:#333;
 }
#comments-block {
 line-height:1.6em;
 }
.comment-author {
 background:#CCFFCC /*comment header background color (comment author name)*/
url("http://www.blogblog.com/dots/icon_comment.gif") no-repeat 2px .35em;
 margin:.5em 0 0;
 padding:0 0 0 20px;
 font-weight:bold;
 }
.comment-body {
 background:#99FFFF; /*Reader comment background color*/
 margin:0;
 padding:7px 7px 7px 7px; /*Modified padding values*/
 }
.comment-body p {
 margin:0 0 .5em;
 }
.comment-body-author {
 background:#cccccc; /*The author comments background color.*/
 margin:0;
 padding:7px 7px 7px 10px; /*Modified padding values*/
}
.comment-body-author p {
 font-size:105%;
 margin:0 0 .2em 0;
 color:#6728B2; /*The author comments text color.*/
 text-decoration:bold;
}
.comment-footer {
 background:#CCFFCC; /*Comment footer background color (comment permalink)*/
 margin:0 0 .5em;
 padding:0 0 .75em 20px;
 color:#996;
 }
.comment-footer a:link {
 color:#996;
 }
.deleted-comment {
 font-style:italic;
 color:gray;
 }

To pick up color hex values that suit your blog you can refer to this link. This is a simple tutorial on how to modify your comment section. You can add a whole lot of CSS to make it look better. Do drop a line here if you are able to create anything good looking based on these lines.
Thursday, December 14, 2006
Google page creator: headache
Google's Page Creator software is seriously pissing me off:

I hope I don't end up breaking my monitor, keyboard or mouse the next time I see this:

BTW Google should hire someone who has written error messages for Microsoft :)) Coz: "oops! I don't like your error messages". Better still don't give me the donuts, just get the page working. Just a thought (pun intended)
Update: Page creator behaves much better after I turned off the experimental features.
Monday, December 11, 2006
Hack Round-up
Hello Readers,
Well, I had no new ideas (except for a few which require CSS knowledge) so I have no new hacks of my own as of now. However, this post points to some good hacks/add-ons/template mods that I have seen in the neighborhood recently:
1. Hacked Son of Moto template by Deniz of imessengr.
2. Adsense beside your posts in blogger beta by Deniz of imessengr.
3. Adsense between the posts (adding adsense directly to the beta template) by Loui$$ of Blogging No Secret.
4. Template theme switcher (and tutorial to host Blogger Beta CSS externally) and hacked Blogger templates with this functionality (inbuilt) by PurpleMoggy.
In addition, I have found my interaction with Deniz and posts from "Blogging Secret" very informative with reference to Adsense related tips (especially for Blogger Beta).
BTW this post is done directly from a nice but nifty Firefox extension called Performancing. I really like their idea/design and concept, especially because I am yet to see my first post from Google Docs appear on my test blog.
Tuesday, December 05, 2006
Control your Layout editor’s layout
Hello Readers,
I was going through the stock dots dark template when I came across a section labeled “Page structure tweaks for layout editor wireframe” just before the closing skin tag in the template head. Soon I realized that I can use this section to modify the looks of my layout editor in the following section:
Template > Page Elements > Add and Arrange Page Elements
For those of you who couldn't follow me, here is a visual of what I am referring to:
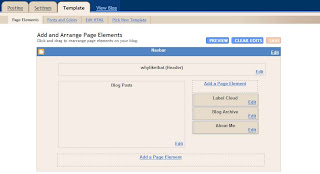
After converting to a three-column layout in my dots dark template, for many months my layout editor was in a mess. This happened because I changed my template’s outer-wrapper width such that there is no wastage of space on a typical 1024x768 resolution screen or in other words I stretched the template to fit snugly :) I did not bother my self with the layout editor and learnt to live with it.
Here’s how my layout editor looked after switching to three columns and then the widebar layout. Call it an example of a bad layout in the layout editor:
However, after the recent switch to the lighter and more legible dots template, I discovered this section of the template and found out that I can completely control the looks of the layout editor from within the template code. Here’s how the code looks:
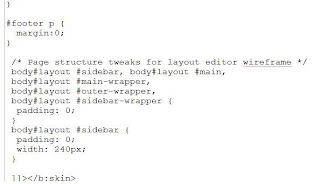
Here’s my modified code to get the layout-editor in order:
and the result is acceptable:
Just look at the code and follow its syntax and how it’s done. Play around with the width values to get the best fit (in a test blog and with backup on original). Soon you should be able to fix layout editor issues on your own. Remember that you can drop a line here in case some thing goes wrong.
I was going through the stock dots dark template when I came across a section labeled “Page structure tweaks for layout editor wireframe” just before the closing skin tag in the template head. Soon I realized that I can use this section to modify the looks of my layout editor in the following section:
Template > Page Elements > Add and Arrange Page Elements
For those of you who couldn't follow me, here is a visual of what I am referring to:

After converting to a three-column layout in my dots dark template, for many months my layout editor was in a mess. This happened because I changed my template’s outer-wrapper width such that there is no wastage of space on a typical 1024x768 resolution screen or in other words I stretched the template to fit snugly :) I did not bother my self with the layout editor and learnt to live with it.
Here’s how my layout editor looked after switching to three columns and then the widebar layout. Call it an example of a bad layout in the layout editor:

However, after the recent switch to the lighter and more legible dots template, I discovered this section of the template and found out that I can completely control the looks of the layout editor from within the template code. Here’s how the code looks:

Here’s my modified code to get the layout-editor in order:
/* Page structure tweaks for layout editor wireframe */

body#layout #sidebar, body#layout #main,
body#layout #main-wrapper,
body#layout #outer-wrapper,
body#layout #sidebar-wrapper {
  padding: 0;
}

body#layout #outer-wrapper {
  padding: 0;
  width: 765px;
  padding: 0 5px 0 10px;
 }

body#layout #sidebar1-wrapper {
  padding: 0;
  width: 150px;
 }

body#layout #sidebar2-wrapper {
  padding: 0;
  width: 170px;
 }

body#layout #widebar-wrapper {
  width: 290px;
  padding: 5px 10px 0 5px;
 }

body#layout #widebar {
  padding: 0;
  width: 290px;
 }

body#layout #main-wrapper {
  padding: 0;
  width: 360px;
  padding: 5px 10px 0 5px;
 }

body#layout #header-wrapper {
  padding: 0;
  width: 750px;
 }

body#layout #footer-wrapper {
  padding: 0;
  width: 750px;
 }

/* End of Page structure tweaks for layout editor wireframe */
and the result is acceptable:

Just look at the code and follow its syntax and how it’s done. Play around with the width values to get the best fit (in a test blog and with backup on original). Soon you should be able to fix layout editor issues on your own. Remember that you can drop a line here in case some thing goes wrong.
Tuesday, November 28, 2006
Show recent posts under a label (category) in a drop-down from horizontal navigation bar
Dear readers,
Based on the new JSON format and the JavaScript code for displaying recent posts from Hans of beautiful beta, I now present horizontal navigational menus with auto (activates on mouse hover) drop-downs which display the most recent posts under each of your labels (say categories).
To see this in action take your mouse cursor to the "Beta Hack" or "Hack News" section in the navigation bar in my blog's head section (i.e. just below the hidden navbar).
This hack will allow readers to browse a particular label category by simply clicking on the label name in the menu or go directly to a specific post under that label by clicking the post title that appears in the drop-down. Therefore, this does not take away the navigational advantage of horizontal tabs in header and at the same time it allows a blog author(s) to give exposure to the most recently updated posts from various label categories.
I found the code for this drop-down menu on dynamic drive at the following link. (Don’t forget to visit this link to learn more about customizing this code according your preferences.)
Warning : If you are not familiar with your template code and HTML I recommend you create a backup copy of your template and/or first try this hack on a test blog.
The Hack
Here is the procedure for installing this hack in your blog:
1. JavaScript source
Copy-paste this line of code into the <head> section of your template, preferably just before </head>
<!-- /***********************************************
* Chrome CSS Drop Down Menu- © Dynamic Drive DHTML code library (www.dynamicdrive.com)
* This notice MUST stay intact for legal use
* Visit Dynamic Drive at http://www.dynamicdrive.com/ for full source code
***********************************************/ -->
<script src='http://stubb.fanatic.googlepages.com/chrome.js' type='text/javascript'/>
To download this file for modification/alternate hosting, right-click here and save to your hard-drive.
2. Including the CSS
Copy-paste any one of these CSS style codes just before the ]]></b:skin> line in the header section of your template. The images (links in the code) are hosted in my test blog, so if you wish to, you can download the images and host them in your own blog.
CSS style 1: Click here to view/download the code.
CSS style 2: Click here to view/download the code.
CSS style 3: Click here to view/download the code.
CSS style 4: Click here to view/download the code.
3. Code in the HTML widget.
Copy-paste this code into a HTML widget from the page layout section (using add a page element feature). You should ideally create this widget in the top most region of your page (like in my blog).
Click here to view/download the widget code.
Modifications:
- Each drop down menu’s code has been demarcated with indicator comments in <!-- … --> If you wish to add additional drop downs, follow the usual flow of the code i.e. a fourth drop down will have
<li><a href="[label link]" rel="dropmenu4">[label name]</a></li>
in the very first div, and
<!--4th drop down menu -->
<div id="dropmenu4" class="dropmenudiv" style="width: 150px;" >
[the js code for calling the post titles]
</div>
to include the function call for displaying post titles.
- Replace all the […]s with the appropriate text as indicated. For example, replace [Label feed URL] with the feed URL of your label which will be of the following format
http://stubborn-fanatic.blogspot.com/feeds/posts/default/-/[LabelName]
If the label name is not one single word and has got spaces between words, replace the spaces with %20
http://stubborn-fanatic.blogspot.com/feeds/posts/default/-/Label%20Name
- The value of “numposts” which by default equals 5, can be modified but I do not recommend increasing it, as long drop-downs might look ugly.
The hack is now installed. Do let me know if you face any problems.
Update: Alastor from nonstop nonsense (but it makes quite a bit of sense here :)) has used the same code from dynamic drive to convert entire widgets into drop-downs! Please visit his blog to learn how. The "Labels" and "Translate" section in my header navigation bar are using this hack.
Sunday, November 26, 2006
Allow your labels to be searched in Technorati and Del.icio.us tags
Hello Friends,
I have developed a simple little add-on for your blog. To know what I am talking about, just see the labels in my post's footer. Notice the tiny Technorati pic beside each label. When clicked, it shows you all the posts from bloggosphere that have been tagged with the label in question. (See end of this post for Del.icio.us how-to)
It is a good way to allow your reader to search Technorati using tags and serves as a sort of "related posts from other blogs" link. Installing this code is fairly simple. Just follow these steps:
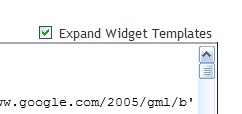
1. Edit your template HTML code and check the "Expand Widget Templates" box. Make a backup of your template if you are not used editing HTML.
2. Look for your post footer i.e. look for <div class='post-footer'>
3. Then in there, look for the labels code i.e. look for <span class='post-labels'>
4. In there, look for the main label href i.e. look for:
<a expr:href='data:label.url' rel='tag'><data:label.name/></a>
and immediately after that line add this code:
That's it! It's as simple as that. However, let me know if your face any problems.
Update: Del.icio.us How-to:
Deniz from imessengr.com has added the "search in Del.icio.us tags" functionality to labels, on similar lines. You can access the code from here.
Technorati Tags: blogger, technorati tags, blogger add-on
I have developed a simple little add-on for your blog. To know what I am talking about, just see the labels in my post's footer. Notice the tiny Technorati pic beside each label. When clicked, it shows you all the posts from bloggosphere that have been tagged with the label in question. (See end of this post for Del.icio.us how-to)
It is a good way to allow your reader to search Technorati using tags and serves as a sort of "related posts from other blogs" link. Installing this code is fairly simple. Just follow these steps:
1. Edit your template HTML code and check the "Expand Widget Templates" box. Make a backup of your template if you are not used editing HTML.
2. Look for your post footer i.e. look for <div class='post-footer'>
3. Then in there, look for the labels code i.e. look for <span class='post-labels'>
4. In there, look for the main label href i.e. look for:
<a expr:href='data:label.url' rel='tag'><data:label.name/></a>
and immediately after that line add this code:
<a expr:href='"http://technorati.com/tag/" + data:label.name' rel='tag' target='_blank' title='Search this tag on Technorati'/><img alt='' border='0' src='http://photos1.blogger.com/x/blogger2/178/17688294081221/320/25365/technorati.gif' style='vertical-align:middle'/></a>
That's it! It's as simple as that. However, let me know if your face any problems.
Update: Del.icio.us How-to:
Deniz from imessengr.com has added the "search in Del.icio.us tags" functionality to labels, on similar lines. You can access the code from here.
Technorati Tags: blogger, technorati tags, blogger add-on
Saturday, November 25, 2006
What's with the backlinks?
On recently published posts across all blogs I am seeing similar backlinks pointing to some page2rss thingy. The mess of links in there, led me here.

What's up with Blogger? What new feature or bug is this? :D
Technorati Tags: blogger search, blogger, backlinks

What's up with Blogger? What new feature or bug is this? :D
Technorati Tags: blogger search, blogger, backlinks
Friday, November 24, 2006
JSON, customizable widgets and other applications
Hello Readers,
There is some really good stuff happening in the Blogger hacking world. This comes after the recent announcement on Blogger buzz regarding Blogger (or I can say all of Google) moving to JSON (JavaScript Object Notification) data format for feeds.
The hacks I am referring to are:
1. Hoctro's Recent Comments/Posts widget.
2. Ramani's Customizable Recent Comments Widget.
3. Hans's Customizable Recent Comments Widget with date and post title (offered in one-click widget install feature).
And this is not it, Stephen from Singpolyma-tech has announced an upgrade for his popular hack - Peek-a-boo comments on main page. All this is really good stuff!
Technorati Tags: JSON, Beta_hacks
Tuesday, November 21, 2006
Cool Technorati Add-ons for your Blog
Hello Readers,
I have come across two cool add-ons for your blog. They are:
1. Technorati Rank display widget by purplemoggy
2. Technorati Blog reactions link from imessengr.com
1. PurpleMoggy has posted a very useful add-on with which one can display their real-time Technorati rank in the blog's sidebar. To get a preview of the add-on and learn the code click here.
2. Deniz from imessengr.com has provided the Blogger Beta code for displaying the number of links from other blogs to a particular post via Technorati's engine. To get a preview of this add-on and learn the code click here.
Friday, November 17, 2006
New hacked template for Blogger beta and return of "flag-blog"
Dears readers,
The topics covered in this post are:
1. A hacked sand-dollar template (with widebar) for blogger beta by imessengr.com
2. "Flag blog" option now available for Blogger beta blogs.
1. Hacked Sand Dollar Template
Deniz from imessengr.com (the one who presented the recent referrers hack for blogger beta) has released a hacked sand dollar template for blogger beta. This template contains a variety of hacks and is based on the widebar design I had discussed earlier in my posts. You can preview this template from here and view this post to learn more and download the template.
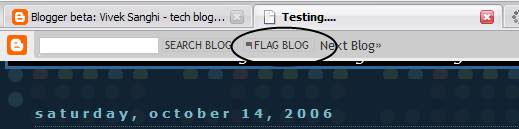
2. "Flag Blog" option now available for Blogger beta blogs.

I just noticed that the "flag blog" or "flag this" button on the navbar which was available only for the classic Blogger blogs in now available for Blogger Beta blogs as well. With this, blogger has brought yet another feature of Blogger v2.0 into beta i.e. v3.0.
The topics covered in this post are:
1. A hacked sand-dollar template (with widebar) for blogger beta by imessengr.com
2. "Flag blog" option now available for Blogger beta blogs.
1. Hacked Sand Dollar Template
Deniz from imessengr.com (the one who presented the recent referrers hack for blogger beta) has released a hacked sand dollar template for blogger beta. This template contains a variety of hacks and is based on the widebar design I had discussed earlier in my posts. You can preview this template from here and view this post to learn more and download the template.
2. "Flag Blog" option now available for Blogger beta blogs.
I just noticed that the "flag blog" or "flag this" button on the navbar which was available only for the classic Blogger blogs in now available for Blogger Beta blogs as well. With this, blogger has brought yet another feature of Blogger v2.0 into beta i.e. v3.0.
Monday, November 13, 2006
Feed, Social Bookmark Drop-down and a Recent referrers hack
Hello Readers,
In this post, I have presented the following add-on for Blogger-Beta:
1. Subscribe drop-down (on-hover) for presenting feed subscription options.
2. Social Bookmark drop-down for Blogger-beta post footers.
3. Extreme Socializer – A Social Bookmarking alternative.
4. Recent Referrers hack by web-messenger.
1. Feed Subscribe Drop-down (on-hover)
You might have noticed the Javascript-based subscribe drop-down (activates on mouse hover) in my blog’s widebar. I had got this one from here. Just go to this link, follow the instructions there in, incorporate the code in a widget and say good-bye to that long list of chicklets occupying your sidebar and also present your reader with a large number of subscription options.
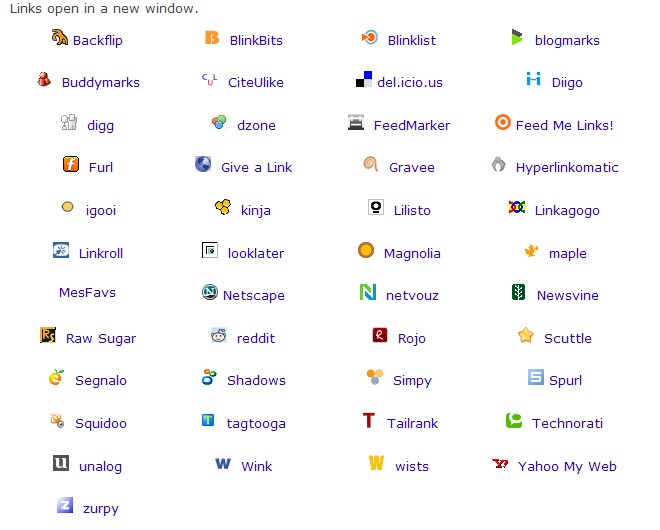
2. Social Bookmark Drop-down
From the same site I also found a tool to create a Social Bookmark drop-down menu (regular type). As this tool cannot create the links for Blogger beta post footers, I have modified their code and put it up for ready use (Thanks to Ramani for the help). You can download the text file containing this code from here. Simply download the text file and copy-paste the code directly into the post-footer portion of your template. See this add-on in action, here.(To learn how to work with post-footers in blogger beta, click here)
The advantage of this system is that you can give your readers the option of choosing from a large number of social bookmarking services without:
1. Sacrificing much space in your post footers.
2. Taking pains to host the social bookmarking icons (images) and then linking to them in your code.
3. Increasing your blog loading time by having a lot of images in the post footer.
In addition, inspite of the large list of bookmarking services in this drop-down, your readers should be able to locate a service (of their choice) easily as the list is in an alphabetical order. If you want to add more services to this drop-down you can look-up for them here and for an exhaustive list, go here (you may need to modify to code for blogger beta).
3. Social Bookmarking alternatives
Another good alternative to present a large number of bookmarking options to your readers without much trouble, is to use Extreme Socializer. Once a reader clicks on the Extreme Socializer icon, they are taken to the Extreme Socializer website where they can choose from a large number of bookmarking services.

Here is the code to be used in post-footers, if you want to use this service:
<a expr:href='"http://ekstreme.com/socializer/?url=" + data:post.url + "&title=" + data:post.title' target='_blank' title='Bookmark anywhere with Extreme Socializer'><img alt='Socialize' border='0' src='[Your image source]'/></a>
You can pick the image for this one from blog’s my post-footer, but please host it on your own :)
Added on Nov 29, 2006: Deniz from imessengr.com has found another good service that offers a range of bookmarking, feed/podcast aggregating options. Please visit his blog to learn about the service and get the code for your blogs.
4. Recent referrers hack
Deniz from web-messengers has presented a hack on how to show a list of recent referrers to your post. You can check-out this hack from here.
In this post, I have presented the following add-on for Blogger-Beta:
1. Subscribe drop-down (on-hover) for presenting feed subscription options.
2. Social Bookmark drop-down for Blogger-beta post footers.
3. Extreme Socializer – A Social Bookmarking alternative.
4. Recent Referrers hack by web-messenger.
1. Feed Subscribe Drop-down (on-hover)
You might have noticed the Javascript-based subscribe drop-down (activates on mouse hover) in my blog’s widebar. I had got this one from here. Just go to this link, follow the instructions there in, incorporate the code in a widget and say good-bye to that long list of chicklets occupying your sidebar and also present your reader with a large number of subscription options.
2. Social Bookmark Drop-down
From the same site I also found a tool to create a Social Bookmark drop-down menu (regular type). As this tool cannot create the links for Blogger beta post footers, I have modified their code and put it up for ready use (Thanks to Ramani for the help). You can download the text file containing this code from here. Simply download the text file and copy-paste the code directly into the post-footer portion of your template. See this add-on in action, here.(To learn how to work with post-footers in blogger beta, click here)
The advantage of this system is that you can give your readers the option of choosing from a large number of social bookmarking services without:
1. Sacrificing much space in your post footers.
2. Taking pains to host the social bookmarking icons (images) and then linking to them in your code.
3. Increasing your blog loading time by having a lot of images in the post footer.
In addition, inspite of the large list of bookmarking services in this drop-down, your readers should be able to locate a service (of their choice) easily as the list is in an alphabetical order. If you want to add more services to this drop-down you can look-up for them here and for an exhaustive list, go here (you may need to modify to code for blogger beta).
3. Social Bookmarking alternatives
Another good alternative to present a large number of bookmarking options to your readers without much trouble, is to use Extreme Socializer. Once a reader clicks on the Extreme Socializer icon, they are taken to the Extreme Socializer website where they can choose from a large number of bookmarking services.
Here is the code to be used in post-footers, if you want to use this service:
<a expr:href='"http://ekstreme.com/socializer/?url=" + data:post.url + "&title=" + data:post.title' target='_blank' title='Bookmark anywhere with Extreme Socializer'><img alt='Socialize' border='0' src='[Your image source]'/></a>
You can pick the image for this one from blog’s my post-footer, but please host it on your own :)
Added on Nov 29, 2006: Deniz from imessengr.com has found another good service that offers a range of bookmarking, feed/podcast aggregating options. Please visit his blog to learn about the service and get the code for your blogs.
4. Recent referrers hack
Deniz from web-messengers has presented a hack on how to show a list of recent referrers to your post. You can check-out this hack from here.
Sunday, November 12, 2006
A Firefox extension and PurpleMoggy's hacks
 Hello readers,
I have been using a Firefox extension by name fasterfox. If slow browsing speed has been a problem for you, I recommend that you give it a shot.
Coming to beta hack, this blog now uses two hacks which I picked up from PurpleMoggy's blog. It appears that a tutorial has been put up for the search box. Please find the tutorial on implementing a 4-in-1 search box (like I have) here.
The second hack I found in PurpleMoggy is a javascript based peek-a-boo system for linklists in sidebar. This is almost same as Blogger University's expand-collapse menu. Just that the hack I am using was picked-up by PurpleMoggy from here and modified using CSS such that it blended very well with my template as well.
Saturday, November 11, 2006
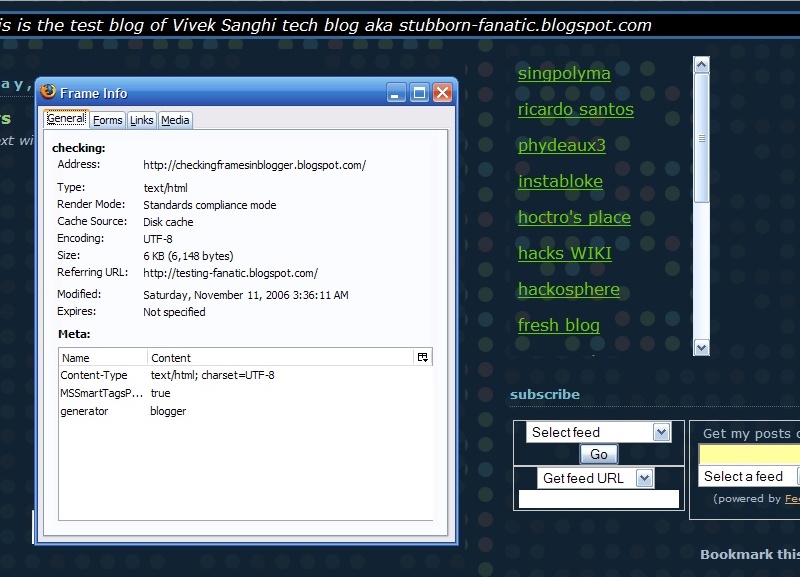
Host HTML pages for Frames in a blogspot address
Dear readers,
If you were a regular visitor to my blog, you might have noticed that I was using frames to display all the link-exchange chicklets until some time ago. I discontinued the use of frames, because they don’t display by default in Internet Explorer or IE (which still seems fairly popular).
I was hosting my frame HTML document at Google pages (as Blogger does not allow HTML file uploads) and it made my blog loading very slow for two reasons:
1. There were a large number of chicklets and some javascript snippets in the frame.
2. Every time my blog was accessed, stuff had to be loaded from google pages as well which is a completely different server/domain.
All I wanted was to use a blogspot domain to host this frame HTML and I found out that it can be easily done.
See these images to know what I am referring to:


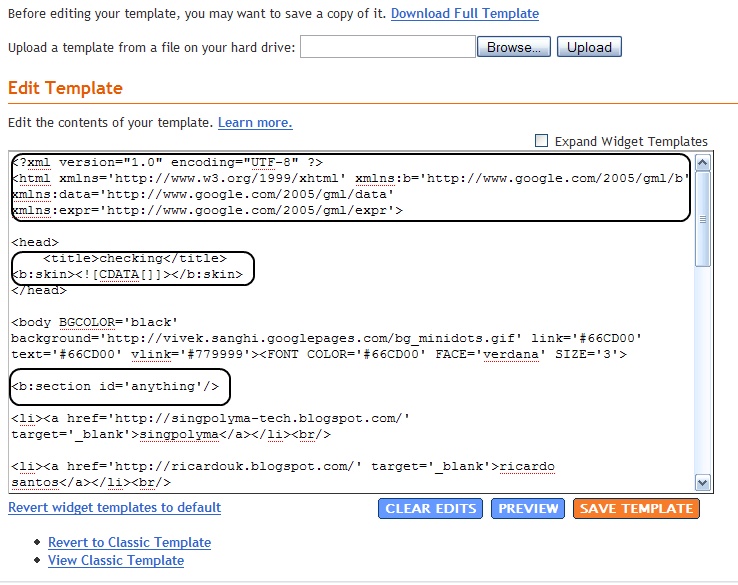
One simply needs to create new blog and strip it of its entire template code except for a few necessary sections. See image to note what needs to be retained:
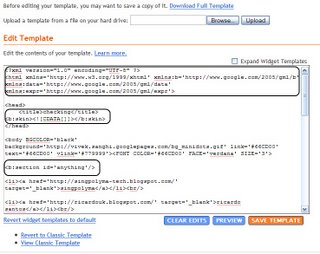
Basically, everything within the <head> </head> tags can be removed except for the skin tags (which need not contain any data if you want a frame). In addition, there must be at least one b:section tag in the <body> portion of the template.
Once you are ready, simply copy-paste your HTML code into the body portion of the template and save the template. For example I had created a simple list of links (different from linklists in page-layout section). You can access this page by clicking here.
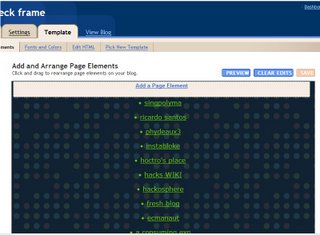
Once you modify the template in this manner, this is how the page layout section will look like:
To embed a frame into your blog’s sidebar, use this code:
<object data="[Your HTML Doc's URL]" width="275" height="300" type="text/html"></object>
Example:
This frame, in action, can be seen here.
Once I had done all this, I thought that IE would display the frame without any issues now, but it appears the IE does not like the <object> tag at all. Even after getting a frame to load from the blogspot domain, I could not get IE to display the frame by default.
Suggestion: Use the Firefox (adsense link) in my blog’s sidebar to download this beautiful browser if you are on IE :)
If you were a regular visitor to my blog, you might have noticed that I was using frames to display all the link-exchange chicklets until some time ago. I discontinued the use of frames, because they don’t display by default in Internet Explorer or IE (which still seems fairly popular).
I was hosting my frame HTML document at Google pages (as Blogger does not allow HTML file uploads) and it made my blog loading very slow for two reasons:
1. There were a large number of chicklets and some javascript snippets in the frame.
2. Every time my blog was accessed, stuff had to be loaded from google pages as well which is a completely different server/domain.
All I wanted was to use a blogspot domain to host this frame HTML and I found out that it can be easily done.
See these images to know what I am referring to:

One simply needs to create new blog and strip it of its entire template code except for a few necessary sections. See image to note what needs to be retained:
Basically, everything within the <head> </head> tags can be removed except for the skin tags (which need not contain any data if you want a frame). In addition, there must be at least one b:section tag in the <body> portion of the template.
Once you are ready, simply copy-paste your HTML code into the body portion of the template and save the template. For example I had created a simple list of links (different from linklists in page-layout section). You can access this page by clicking here.
Once you modify the template in this manner, this is how the page layout section will look like:

To embed a frame into your blog’s sidebar, use this code:
<object data="[Your HTML Doc's URL]" width="275" height="300" type="text/html"></object>
Example:

This frame, in action, can be seen here.
Once I had done all this, I thought that IE would display the frame without any issues now, but it appears the IE does not like the <object> tag at all. Even after getting a frame to load from the blogspot domain, I could not get IE to display the frame by default.
Suggestion: Use the Firefox (adsense link) in my blog’s sidebar to download this beautiful browser if you are on IE :)
Thursday, November 09, 2006
Adding a wider-sidebar to your blog
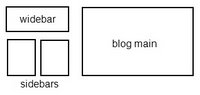
Impressed by Wordpress’s Andreas04 template, I wondered if we can have some thing similar for Blogger beta. The answer is yes. Please view the image to understand the layout I am referring to:

It is much easier to play around with the template in Blogger beta because of its easy to understand template script language and the flexibility to view the template in collapsed and expanded widgets view (about which I will discuss a little later).
Co-incidentally this layout is same as Ramani’s blog design (where he calls the third sidebar a widebar and for simplicity sake I shall also do the same). Click here to preview the implementation of this hack in Blogger beta.
Before we proceed and learn how to implement this layout, I would like to discuss some nitty-gritty of the beta template. I do not want to give a detailed walk-through of the template here. You can find that here.
Wrappers are an important part of the Blogger beta template and in simple terms they are used to allocate/fix some thing in its place. To explain this I will use an example. Suppose you have a large piece of land and you want to build a school, a shopping mall, a hotel and theater and a pizza store on it. One of the first steps in planning will be to identify where to build what. Once that is done, you will allot a portion of the land to that item.
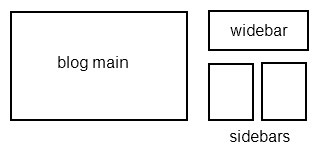
In your template, what is your land is defined by some thing called ‘outer-wrapper’ (if you exceed a particular size, you page will fall out of an average user’s screen area). In this land (the outer-wrapper), you can create/allot a space for:
1. School (say header using header-wrapper),
2. Pizza store (say sidebar1 using sidebar1-wrapper),
3. Theater (say sidebar2 using sidebar2-wrapper),
4. Shopping mall (say widebar using widebar-wrapper) and
5. Hotel (blog’s main section (where posts appear) using a main-wrapper)
Some templates do not assign wrappers for the individual page sections like sidebars, blog main etc, however in my template each of the blog main, sidebars and the header have their own separate wrapper.
Once the wrappers are done (i.e. space alloted), you need to set the parameters for the construction of the buildings. All of this is done in the “page structure” section of the template. (may vary according to the template you use)

Some specifics are also set further below this section, like this:

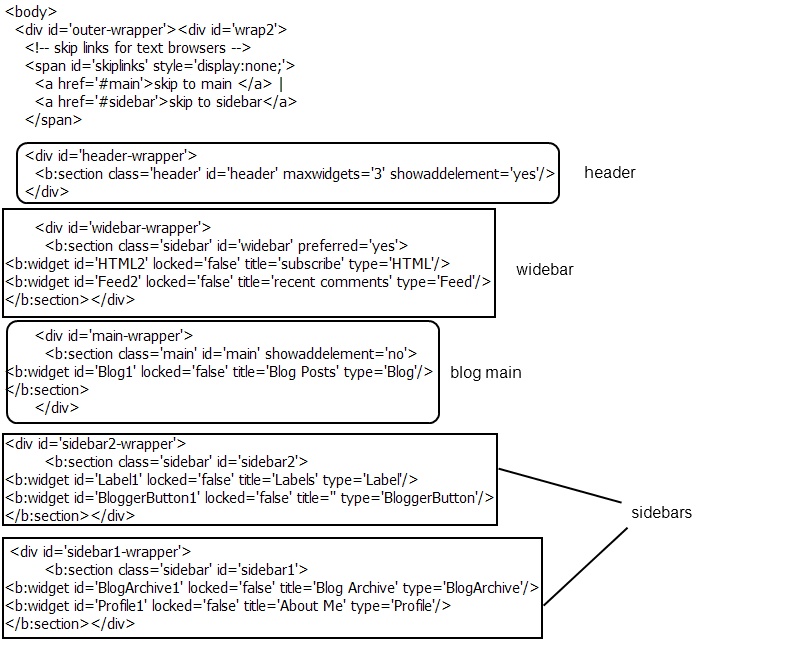
Another nice thing about the template (as mentioned earlier) is the collapsed and the expanded widgets view. In the <body> section of the template (when viewed in the collapsed widgets (or default) view), you should be able to make out that each of these page sections like blog main, sidebars etc are in the following coding format.
<div id='sidebar2-wrapper'>
<b:section class='sidebar' id='sidebar2'>
<b:widget id='Label1' locked='false' title='Labels' type='Label'/>
<b:widget id='HTML1' locked='false' title='link exchange' type='HTML'/>
<b:widget id='HTML5' locked='false' title='' type='HTML'/>
<b:widget id='BloggerButton1' locked='false' title='' type='BloggerButton'/>
</b:section></div>
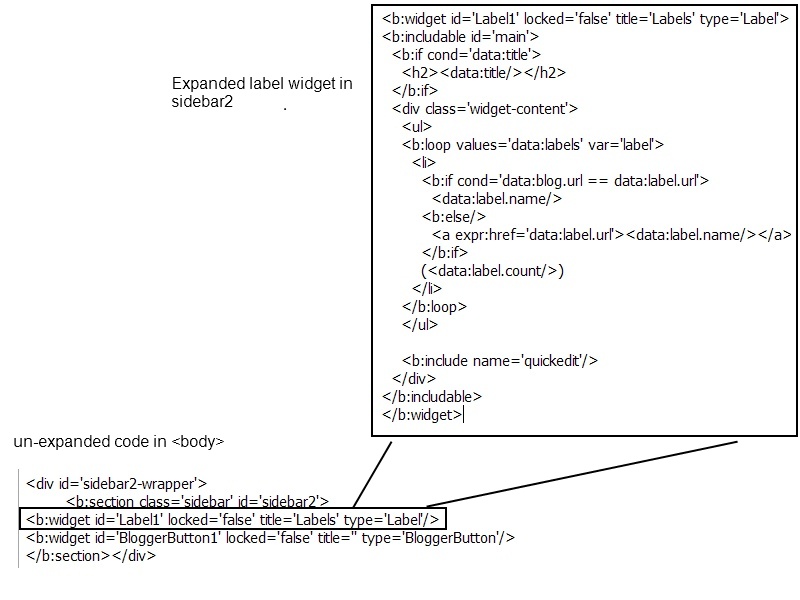
Notice how the actual section is enclosed within the wrapper. Also notice the widget tags, the page elements (draggable and droppable boxes) we add from the layout section of the Blogger beta dashboard. These widget tags are the ones that expand in the expanded widgets view.
Here is how an expanded widget looks like in the expanded template:

Coming back to the wrappers, all these wrappers will inturn be enclosed in the ‘outer-wrapper’ (the land) which starts immediately after the <body> tag:
<body>
<div id='outer-wrapper'> <div id='wrap2'>
[code]
</div></div >
Note that the blog main and the sidebars are enclosed in an additional wrapper called the content-wrapper that distinguishes it from the header and the footer wrappers/sections.
The hack
Note:
1. This hack is highly customized for the dots-dark template. I recommend that you go ahead with it if you have some experience working with the Blogger template and can troubleshoot simple design/formatting issues.
2. If you have even the slightest doubt, please first try this hack on a test blog (create a new blog if you don’t have one) and then implement it on your original blog)
3. If you cannot fix some issue and wish to e-mail me with the problem, please do so with your template code (in non-expanded form) as a text file attachment.
Now that you have read the tutorial above, implementing this hack becomes very easy. All you need to do is create an additional sidebar wrapper (name it widebar) and set its parameters and modify the <body> part to reflect the same. This can be done irrespective of whether you are using two side bars or one sidebar. However, having this hack with two sidebars makes more sense to me :).
This code goes into the <head> section of the template, where you find similar code. For example this code will fit well just above the ‘sidebar-wrapper’.
#widebar-wrapper {
width:360px;
float:right;
padding-bottom:10px;
word-wrap: break-word; /* fix for long text breaking sidebar float in IE */
}
#widebar {
width:360px;
padding:10px 0 5px 10px;
word-wrap: break-word; /* fix for long text breaking sidebar float in IE */
}
This is how your sidebar wrappers and parameter settings code should look like:
#sidebar1-wrapper {
width:150px;
float:right;
margin-left:5px;
padding-bottom:10px;
word-wrap: break-word; /* fix for long text breaking sidebar float in IE */
}
#sidebar2-wrapper {
width:150px;
float:right;
margin-left:20px;
padding-bottom:10px;
word-wrap: break-word; /* fix for long text breaking sidebar float in IE */
}
#sidebar1 {
padding:0 0 10px 5px;
width:150px;
}
#sidebar2 {
padding:0 0 10px 5px;
width:150px;
}
If you want to have the blog-main section on the right and the sidebars on the left, change the “float” value in widebar-wrapper and sidebar-wrapper to “left” and in the main-wrapper, change it to “right”. Also make the necessary adjustments to the margin and padding values.
Once you are done with that, go to the body section (in the unexpanded view) and insert this just above the main block but within the content-wrapper:
<div id='widebar-wrapper'>
<b:section class='sidebar' id='widebar' preferred='yes'>
</b:section></div>
Look at the image below to see how it looks like (make sure that the order of the wrappers is exactly the same).

As this hack requires/assumes reader have a fair idea of working with the beta template, if your are not into template editing, I suggest that you try this out in a test blog first. Happy blog modding. Until next time.
Note:
1. I know that some of the coding mentioned here might be different in your blog but the basis of design is the same (that’s why the tutorial before that hack). If you are unable to find something in the code, I suggest that you copy the template code (in non-expanded form) into a text editor and then look for it.
2. If you have even the slightest doubt, please first try this hack on a test blog (create a new blog if you don’t have one) and then implement it on your original blog.
Updates:
1. Annie from BlogU has developed a fluid version of this hack that teaches one to make a widebar such that it resizes it self according tp the browser window size. Check it out here.
2. If on certain pages/main page of your blog, the sidebars appear beside the widebar instead of underneath the widebar, please follow the fix from here or directly look at the fix here.

It is much easier to play around with the template in Blogger beta because of its easy to understand template script language and the flexibility to view the template in collapsed and expanded widgets view (about which I will discuss a little later).
Co-incidentally this layout is same as Ramani’s blog design (where he calls the third sidebar a widebar and for simplicity sake I shall also do the same). Click here to preview the implementation of this hack in Blogger beta.
Before we proceed and learn how to implement this layout, I would like to discuss some nitty-gritty of the beta template. I do not want to give a detailed walk-through of the template here. You can find that here.
Wrappers are an important part of the Blogger beta template and in simple terms they are used to allocate/fix some thing in its place. To explain this I will use an example. Suppose you have a large piece of land and you want to build a school, a shopping mall, a hotel and theater and a pizza store on it. One of the first steps in planning will be to identify where to build what. Once that is done, you will allot a portion of the land to that item.
In your template, what is your land is defined by some thing called ‘outer-wrapper’ (if you exceed a particular size, you page will fall out of an average user’s screen area). In this land (the outer-wrapper), you can create/allot a space for:
1. School (say header using header-wrapper),
2. Pizza store (say sidebar1 using sidebar1-wrapper),
3. Theater (say sidebar2 using sidebar2-wrapper),
4. Shopping mall (say widebar using widebar-wrapper) and
5. Hotel (blog’s main section (where posts appear) using a main-wrapper)
Some templates do not assign wrappers for the individual page sections like sidebars, blog main etc, however in my template each of the blog main, sidebars and the header have their own separate wrapper.
Once the wrappers are done (i.e. space alloted), you need to set the parameters for the construction of the buildings. All of this is done in the “page structure” section of the template. (may vary according to the template you use)

Some specifics are also set further below this section, like this:

Another nice thing about the template (as mentioned earlier) is the collapsed and the expanded widgets view. In the <body> section of the template (when viewed in the collapsed widgets (or default) view), you should be able to make out that each of these page sections like blog main, sidebars etc are in the following coding format.
<div id='sidebar2-wrapper'>
<b:section class='sidebar' id='sidebar2'>
<b:widget id='Label1' locked='false' title='Labels' type='Label'/>
<b:widget id='HTML1' locked='false' title='link exchange' type='HTML'/>
<b:widget id='HTML5' locked='false' title='' type='HTML'/>
<b:widget id='BloggerButton1' locked='false' title='' type='BloggerButton'/>
</b:section></div>
Notice how the actual section is enclosed within the wrapper. Also notice the widget tags, the page elements (draggable and droppable boxes) we add from the layout section of the Blogger beta dashboard. These widget tags are the ones that expand in the expanded widgets view.
Here is how an expanded widget looks like in the expanded template:
Coming back to the wrappers, all these wrappers will inturn be enclosed in the ‘outer-wrapper’ (the land) which starts immediately after the <body> tag:
<body>
<div id='outer-wrapper'> <div id='wrap2'>
[code]
</div></div >
Note that the blog main and the sidebars are enclosed in an additional wrapper called the content-wrapper that distinguishes it from the header and the footer wrappers/sections.
The hack
Note:
1. This hack is highly customized for the dots-dark template. I recommend that you go ahead with it if you have some experience working with the Blogger template and can troubleshoot simple design/formatting issues.
2. If you have even the slightest doubt, please first try this hack on a test blog (create a new blog if you don’t have one) and then implement it on your original blog)
3. If you cannot fix some issue and wish to e-mail me with the problem, please do so with your template code (in non-expanded form) as a text file attachment.
Now that you have read the tutorial above, implementing this hack becomes very easy. All you need to do is create an additional sidebar wrapper (name it widebar) and set its parameters and modify the <body> part to reflect the same. This can be done irrespective of whether you are using two side bars or one sidebar. However, having this hack with two sidebars makes more sense to me :).
This code goes into the <head> section of the template, where you find similar code. For example this code will fit well just above the ‘sidebar-wrapper’.
#widebar-wrapper {
width:360px;
float:right;
padding-bottom:10px;
word-wrap: break-word; /* fix for long text breaking sidebar float in IE */
}
#widebar {
width:360px;
padding:10px 0 5px 10px;
word-wrap: break-word; /* fix for long text breaking sidebar float in IE */
}
This is how your sidebar wrappers and parameter settings code should look like:
#sidebar1-wrapper {
width:150px;
float:right;
margin-left:5px;
padding-bottom:10px;
word-wrap: break-word; /* fix for long text breaking sidebar float in IE */
}
#sidebar2-wrapper {
width:150px;
float:right;
margin-left:20px;
padding-bottom:10px;
word-wrap: break-word; /* fix for long text breaking sidebar float in IE */
}
#sidebar1 {
padding:0 0 10px 5px;
width:150px;
}
#sidebar2 {
padding:0 0 10px 5px;
width:150px;
}
If you want to have the blog-main section on the right and the sidebars on the left, change the “float” value in widebar-wrapper and sidebar-wrapper to “left” and in the main-wrapper, change it to “right”. Also make the necessary adjustments to the margin and padding values.
Once you are done with that, go to the body section (in the unexpanded view) and insert this just above the main block but within the content-wrapper:
<div id='widebar-wrapper'>
<b:section class='sidebar' id='widebar' preferred='yes'>
</b:section></div>
Look at the image below to see how it looks like (make sure that the order of the wrappers is exactly the same).
As this hack requires/assumes reader have a fair idea of working with the beta template, if your are not into template editing, I suggest that you try this out in a test blog first. Happy blog modding. Until next time.
Note:
1. I know that some of the coding mentioned here might be different in your blog but the basis of design is the same (that’s why the tutorial before that hack). If you are unable to find something in the code, I suggest that you copy the template code (in non-expanded form) into a text editor and then look for it.
2. If you have even the slightest doubt, please first try this hack on a test blog (create a new blog if you don’t have one) and then implement it on your original blog.
Updates:
1. Annie from BlogU has developed a fluid version of this hack that teaches one to make a widebar such that it resizes it self according tp the browser window size. Check it out here.
2. If on certain pages/main page of your blog, the sidebars appear beside the widebar instead of underneath the widebar, please follow the fix from here or directly look at the fix here.
Sunday, November 05, 2006
Displaying widgets only on comment, label, search and archive pages
Hello Friends,
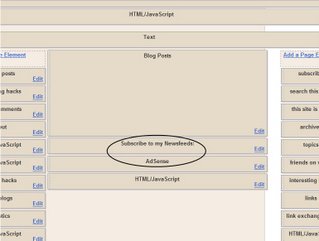
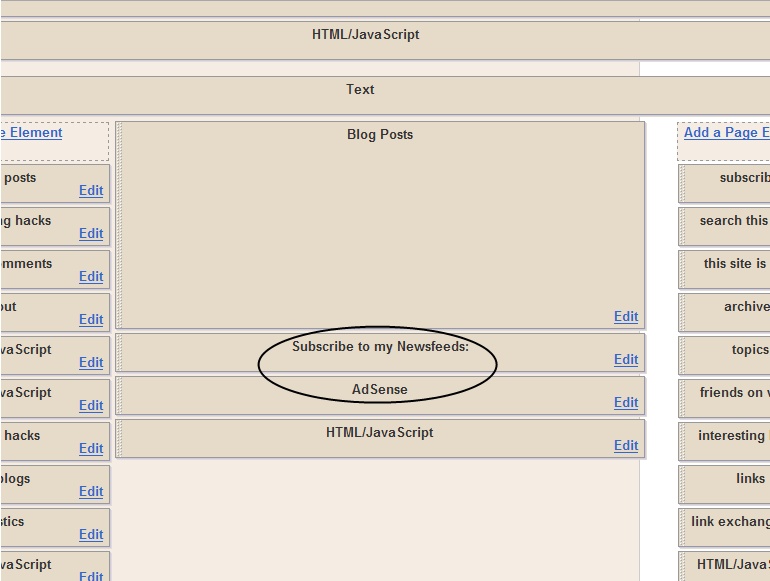
From certain site tracking services, I have been looking at the way people come to know about my blog and I realized that only few of them access my blog directly (using its main URL). Most of them come looking for some hack (like social bookmarking, Google Translate etc) and land on an individual post page. When they land on such a page, a lot of space under the article + comments section goes waste as my blog’s sidebars (in most cases) are longer than the length of the post + comments section. This is also the case on label, archive and search pages. I was wondering how to make efficient utilization of this wasted space so that such first time readers (of my blog) get enough information about my other posts and I am able to convert them to returning readers/visitors.
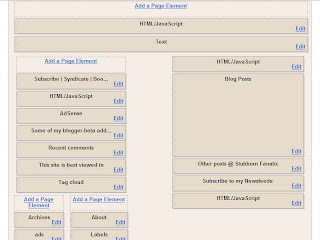
I turned to instabloke for ideas and found that Blogbloke has made very good use of this space by posting a list of other articles, newsfeeds of his blog and adsense code. Inspired by his ingenuity, I decided to implement the same for blogger beta. To understand what I am talking about have a look at these pictures:
1. Bottom of the "main" section on my blog’s main page:

2. Bottom of the “main” section on a label page:
3. Bottom of the “main” section on a individual post/comments page:

You will notice that certain sections that do not appear on my blog’s main page appear on the label, archive, post/comments and search pages (I refer to them as “non-main” pages). See this image below. The highlighted widgets in the following image do not appear on the main page but appear on all other pages (i.e. non-main pages):
Here’s how you can also make a widget to appear on all other pages except the main blog page.
1. Add a page element
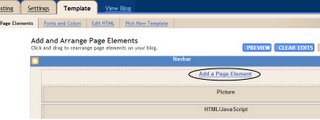
First add a page element (widget) of your choice from you blog’s page element (Edit Layout) section. Don’t forget to give it a unique title as it becomes easier to search for the widget in the template code.
2.View template code
Then go to the Edit HTML section of your blog and view the expanded widgets template code. (Please make a backup copy of your template before you proceed)
3. Search for the newly added widget/page element

Now in template code search for the widget you just added using its title.
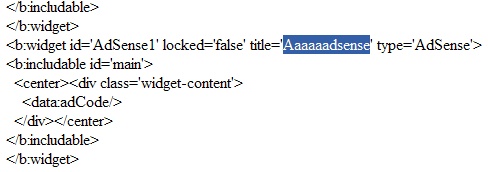
4. Modify the Widget code
Modify the code as shown below by adding the “if” condition (in bold). Make sure you add the “if” condition just after the <b:includable id='main' section> and the closing “if” code just before the </b:includable>.
<b:widget id='AdSense1' locked='false' title='' type='AdSense'>
<b:includable id='main'>
<b:if cond='data:blog.homepageUrl != data:blog.url'>
<div class='widget-content'>
<data:adCode/>
</div>
</b:if>
</b:includable>
</b:widget>
5. Now save the template and you are done.
A special mention here for an Ajax-based hack by Hoctro which I used to display a large number of posts on my blog’s “non-main” pages. I did not use the feed widget for this purpose as Blogger limits the list to a max of five posts.
So go ahead and fill up those spaces and feel free to drop a line if you face any issues.
Update-01: To learn how to display widgets only on the blog's main page click here.
Update-02: To learn how to display a widget only on a particular label page or any other URL (from the same blog), click here.
From certain site tracking services, I have been looking at the way people come to know about my blog and I realized that only few of them access my blog directly (using its main URL). Most of them come looking for some hack (like social bookmarking, Google Translate etc) and land on an individual post page. When they land on such a page, a lot of space under the article + comments section goes waste as my blog’s sidebars (in most cases) are longer than the length of the post + comments section. This is also the case on label, archive and search pages. I was wondering how to make efficient utilization of this wasted space so that such first time readers (of my blog) get enough information about my other posts and I am able to convert them to returning readers/visitors.
I turned to instabloke for ideas and found that Blogbloke has made very good use of this space by posting a list of other articles, newsfeeds of his blog and adsense code. Inspired by his ingenuity, I decided to implement the same for blogger beta. To understand what I am talking about have a look at these pictures:
1. Bottom of the "main" section on my blog’s main page:

2. Bottom of the “main” section on a label page:

3. Bottom of the “main” section on a individual post/comments page:
You will notice that certain sections that do not appear on my blog’s main page appear on the label, archive, post/comments and search pages (I refer to them as “non-main” pages). See this image below. The highlighted widgets in the following image do not appear on the main page but appear on all other pages (i.e. non-main pages):
Here’s how you can also make a widget to appear on all other pages except the main blog page.
1. Add a page element

First add a page element (widget) of your choice from you blog’s page element (Edit Layout) section. Don’t forget to give it a unique title as it becomes easier to search for the widget in the template code.
2.View template code

Then go to the Edit HTML section of your blog and view the expanded widgets template code. (Please make a backup copy of your template before you proceed)
3. Search for the newly added widget/page element
Now in template code search for the widget you just added using its title.
4. Modify the Widget code
Modify the code as shown below by adding the “if” condition (in bold). Make sure you add the “if” condition just after the <b:includable id='main' section> and the closing “if” code just before the </b:includable>.
<b:widget id='AdSense1' locked='false' title='' type='AdSense'>
<b:includable id='main'>
<b:if cond='data:blog.homepageUrl != data:blog.url'>
<div class='widget-content'>
<data:adCode/>
</div>
</b:if>
</b:includable>
</b:widget>
5. Now save the template and you are done.
A special mention here for an Ajax-based hack by Hoctro which I used to display a large number of posts on my blog’s “non-main” pages. I did not use the feed widget for this purpose as Blogger limits the list to a max of five posts.
So go ahead and fill up those spaces and feel free to drop a line if you face any issues.
Update-01: To learn how to display widgets only on the blog's main page click here.
Update-02: To learn how to display a widget only on a particular label page or any other URL (from the same blog), click here.
Saturday, November 04, 2006
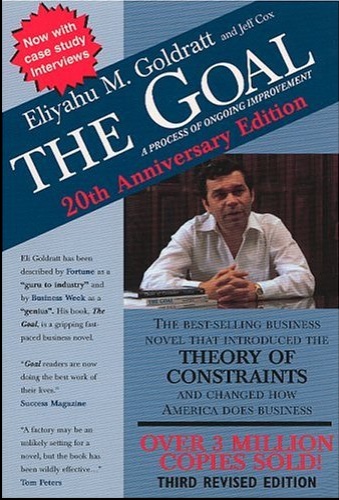
The Goal – Eliyahu M. Goldratt and Jeff Cox (Book Review 009)
ISBN: 8185984131
Tagline: A process of ongoing improvement.
The Goal was not on my reading list. However, it was lying around in the house and I decided to go ahead with it. The size of this book was very uninviting and from all the text on the covers and in the intro pages, I thought that I’d be better off reading this book during or after my MBA even though it seemed like a best-seller. However, once I started to read I realized that this whole "Theory of constraints" thing is actually presented in the form of a story which is very easy to grasp.
 About the Author
Dr. Eliyahu M. Goldratt is an internationally recognized leader in the development of new business management concepts and systems, and acts as an educator to many of the world’s corporations. He is the originator of the Theory of Constraints (TOC) and his ideas have revolutionized the way companies work.
In addition to his pioneering work in manufacturing management, he holds patents in other areas, ranging from medical devices to temperature sensors. Other books from Goldratt, on this topic, are It's Not Luck, Critical Chain and Necessary But Not Sufficient.
The Goal
Plainly speaking The Goal is a book on Theory of Constraints. However along with the message, another important side to this book is the method the author has adopted to deliver the message. The Goal is actually the story (probably fictitious) of a plant manager by name Alex Rogo who manages a plant that is unable to ship any of its orders on time and is also loosing money for its division. In addition, Alex has a messed-up personal life due to frequent fights with his wife.
Alex is given a deadline to make the plant profitable (failing which it will be closed). He desperately wants to save his plant and in the process he meets his university professor and acquaintance (from college days), Jonah (which I think is characterizing Goldratt because both have a degree in Physics from Israel). Alex’s interactions with Jonah show him the right path. Jonah is a kind of teacher who encourages his students to discover answers on their own and he does that same with Alex (regarding the problem with his plant). Through Alex’s process of discovery the author explains the theory of constraints is a very simple manner. I was particularly impressed by the use of simple yet powerful example of boys marching in a line. The author through Alex’s discussions with his co-workers also highlights the short comings of cost-accounting where inventory is viewed as an asset on the balance sheet and the blind emphasis of management to cut costs wherever possible (which many times leads to death of sick business units that could have been turned around).
Conclusion
Services have become the fad of today and it is amazing to think about the application of TOC to the Services scenario (though I need to grow-up a little more to think about it in detail). With the advent of Globalization 3.0 (in terms of Thomas Friedman) and the ability of a business to break up a process, digitize it and outsource it to various parts of the world where they can be done (for cheapest price and best quality) simultaneously and delivered back in one piece to the HQ control, the relevance of this theory is questionable. However, I am sure that it still has a lot of implications on supply chains where constraints or bottlenecks may exist (again I need to learn a lot more to think in detail).
In one of the management fests I had participated in during my college days, I had taken part in a production game where there was a production line with different work centers. The performance of the participants was measured in terms of their ability to meet customer demands and have least inventories and turn-around times at the end of the game. Had I read this book back then, before that event, I am sure I would have done much better than the third spot out of fifth that I had got in that event.
Wednesday, November 01, 2006
Auto-hide blogger navbar like Windows taskbar
Hello Friends,
Avatar from Bloggeratto has put up a comprehensive post on how to get your blogger navbar to auto-hide like the Microsoft Windows taskbar. This means that after using the code from his post you can make the blogger navbar hidden and it appears only when one hovers the mouse cursor over the navbar section.
To view what I am talking about, just view Bloggeratto in Firefox and check out the navbar section. See how the navbar appears when you bring the mouse cursor near it and auto-hides when the mouse cursor is taken away. You can learn this hack on Bloggeratto from here.
Monday, October 30, 2006
The Tipping Point – Malcolm Gladwell (Book Review 008)
ISBN 0349114463
Tagline: How little things can make a big difference
I was looking forward to reading books by Malcolm Gladwell and finally got my hands on The Tipping Point. It is not a very big book and I managed to finish it in three days, reading only in my free time. Most of you might be aware that The Tipping Point is popular bestseller and a highly appreciated book. I am glad I was able to take time off to read this one.
 About the Author
Malcolm Gladwell covered business, science and medicine for the Washington Post before becoming the New York City bureau chief. Currently he is a staff writer for the New Yorker. He has also authored another popular book by name Blink
The Tipping Point
The Tipping Point is a book in which the author tries to explain why certain things happen the way they do. In the numerous examples that he explores, he shows that for a big-time change to occur, very minor change (involving the right set of numbers) tends to be the cause. For example, Fashion changes regularly and lots of trends become a craze with the masses which the author calls social epidemics. This book analyses such fashion trends and how they came out of nowhere to become a social epidemic. In addition, it gives a general basis for why and how such things occur and the key players in the process.
The author incorporates data from a number of research reports by various professionals to provide a solid basis for his analysis model and with seemingly flawless knack for generalization uses the same model over and over to analyze a wide variety of problems like the rise and fall of crime in the New York city, the problems of corporate management and governance, trends in suicides and effect of celebrity suicides, truth about addiction to smoking.
This book clearly provides a scientific basis for the kind of solutions that we might discover by trial and error and convert it to convention wisdom. The author shows how making seemingly unnecessary changes in the way information is presented can make it more useful and productive by leaps and bounds.
One thing particularly fascinating about this book is the huge number of sources from which the author draws out raw information, converts it into simple language and puts it in front of his readers. The number of examples, varying from individuals to corporations, is very good and well placed.
While reading the chapter on suicides, I was able to think of similar situations that had happened in India in the not so distant past. Once there was a case of a child committing suicide because he was frustrated with academics and felt overwhelmed by studies during his examinations. Once the news of the suicide and the reason for it came in, a number of similar cases from all over the country started to appear in the print media and television. People were suddenly worried about the increasing load of education on teenagers and I observed that they started dealing with them very cautiously. For example, in my Junior College (that’s last two years just before start of bachelor courses), lecturers stopped roughing up students for not completing their home-works or scoring low in weekly exams because the teachers’ committee was too scared to even imagine some guy from their college committing suicide for study-related reasons.
The Tipping Point vs. Freakonomics
The Tipping Point covers a few topics like crime rates and parenting that were also covered in a recent book called Freakonomics. While the Gladwell does not say much about parenting except for the well proven facts that parents do not have much control on what kind of person their kid turns out to be when he/she grows up.
However, in the chapter on crime, the authors lists many of the reasons like aging of population, stringent policing by cops etc as contributors to the fall in crime rate while Freakonomics dismisses them as “of lesser significance”. While abortions can have a good affect on the crime rates and fairly suddenly in demographic terms, I do think reasons like aging of population cannot be overlooked. I am not sure how Police has contributed to the whole thing. Gladwell mentions the Broken Window Theory of crime and also talks about how it was employed by NYPD and the underground railway department to a tipping point effect. However, one thing to be noted here is that this is only about the crime rates in New York (as Gladwell explicitly mentions) and not about the whole of America (which Freakonomics tries to explain). So it sounds like a case of New York in particular (America in General) vs America in particular (New York in General). I think, may be all these factor came together and acted at the same time thus resulting in a sharp dive in the crime curve which otherwise would have gone down gradually as each of these factors started to have their affects.
In all, The Tipping Point is a book that I recommend everyone should read at least once.
Sunday, October 29, 2006
The World is Flat – Thomas L. Friedman (Book Review 007)
ISBN: 0141022728
Tagline: The Globalized world in the Twenty-First century
Hanging around for almost a month with The World is Flat, I finally completed it despite all the time constraints I was under. I have never read such a thick book back-to-back in my life until this one and this book is very special not just in that sense. I could have completed it within a short span but the sheer density of information and ideas in this book forced me to read it slowly and in parts. So I used to read a couple of pages and then sit back and ponder about them in my free time in order to assimilate the information well.
After reading the first few pages of this book I understood how important and dense this book was and to beat the density which posed such a challenge, I actually used a pencil to underline important points as I read this book. Why? This isn’t just a book to be read and kept in the cupboard to gather dust; it can serve as a great reference book for a variety of purposes.
 About the Author
Thomas L. Friedman works for The New York Times and is one of the world’s most respected journalists, renowned for his expertise on international affairs and economic issues. He has won the Pulitzer Prize three times and is the author of international best sellers like “From Beirut to Jerusalem”, “The Lexus and the Olive Tree” and “Longitudes and Attitudes”.
The World is Flat
In this book the author has charted the technologies that have affected our lives most profoundly and made the world a much smaller place (or Flat) by breaking the barriers to communication and cultural exchange. This book is a dense store house of information which covers stuff from 11/9 when the Berlin wall came down to 9/11 when the tragic WTC attacks took place and beyond. It tells us why the world shrunk and what technologies and players are responsible for this.
In the next set of chapters the author discusses the affects of the Flattening of the world on America with clear emphasis and the out-sourcing phenomenon and moving of jobs from America to Asia. The author is rightly concerned about the falling number of fresh American engineers and rising average age of the existing group of engineers. He emphasizes on the need for America to revamp their education system at the school level so that it continues to drive the world into new frontiers of innovation and technology. The author talks about the kind of jobs that can be outsourced or automated and the people (which he calls The Untouchables) that cannot be affected by this out-sourcing phenomenon as they always stay one step ahead of it.
Then there is a chapter about developing countries in the Flat World. The author highlights some of the short comings of various developing countries bring to forefront the lack-luster performance of the respective governments in certain cases.
The author also discusses about the people who have not been able to take advantage of the Flat world i.e. poverty stricken people in various developing and under-developed countries and people living in closed societies which have made themselves impervious to external influences. He has also written at length about certain obvious and not so obvious forces that hamper the flattening process of the world and also talked about how terrorists are using the Flat World platform to their advantage.
In the chapters pertaining to the affect of Flat world on America and the Developing Countries of the World, the author has mentioned many points which are very unique and innovative in my opinion. What he has mentioned seem to me like the characteristics or the directive principles to any country to become a superpower in this world. Another very good point in my opinion is the idea of America moving to alternative sources of energy and reducing its dependence on oil imports which will help cut down on pollution, Global Warming, exhaustion of non-renewable energy sources and also shut the income sources of certain dangerous state and non-state players which are a threat to World Peace. I think this is not just for America but can be extended to many countries like India and China which are contributing massively to Global Air Pollution levels.
I have spent almost a month with this book and analyzed the length, breadth and depth of ideas mentioned in here. The author has traveled to many countries, spoken to many people and learnt many new thing while writing this book. Tremendous efforts have gone into the development of this book and no wonder this book is so dense with ideas. I was glad to learn about the early nineties era of technology which I knew about only in fragments because I sprang up on the I.T scene only around mid 1998 after seeing a computer game called Shadow Warrior at a Friend’s house :)
Immediately after completing this book, I had felt that if some one in Year 3K will look back at the beginning of the Millennium and try to study the history of technology and its influence on the world, one of the books they might like to refer to will be this one. I have not read any book from this author before but after reading this one, I am convinced that I got to read his previous works as well.
P.S. If you have a flare for I.T. and Business quizzing, this can be a good book to lookup the names of major I.T. companies, their founders and CEOs.
Friday, October 13, 2006
Google Docs & Spreadsheets (updated)
With this service, you can:
- Have your documents published online (as a webpage) to share it with others (dedicated URL to each document, as in Google pages)
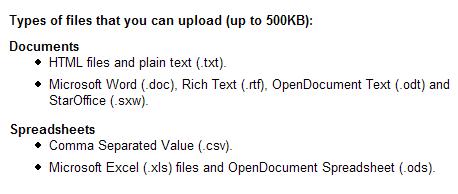
- Export your online documents in word, openoffice, HTML and PDF file formats to store it on your hard drive.
- Import various document (.htm, .doc, .txt, .rtf, .odt, .sxw) and spreadsheet (.csv, .xls, .ods) file formats into this service and publish them online instantly or save it to your hard drive in a different format. So if you want to convert a Microsoft Word file into Adobe PDF format, you can do it easily using this service.
- Collaborate and work with others on projects and set access permissions to files.
- Post to other blogging tools (other than Blogger) like wordpress, LiveJournal etc and also use with custom hosted sites.
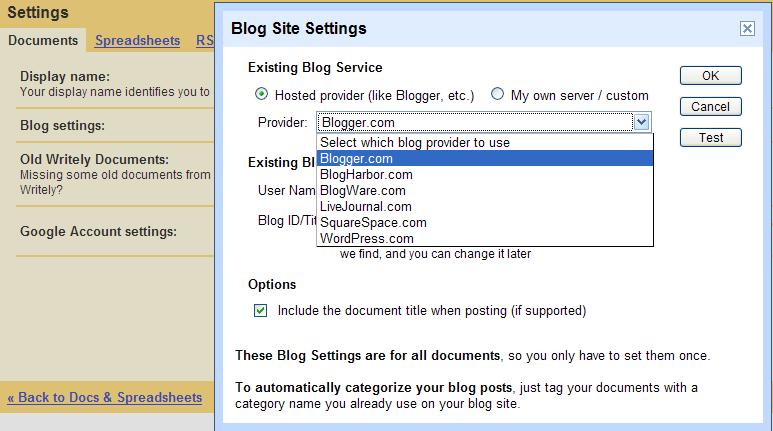
To learn more about this service, you may visit this page.
Problems
1. Unable to Login to Blogger

While editing my posts yesterday, I noticed that Blogger had even added a small side-box on the edit post pages to inform users of this service. That’s how I came to know about this service. However, when I used this service, it could not authenticate my blogger beta account (even after my providing the correct login credentials). I knew this was a bug and it was confirmed when in the evening, I noticed that the side-box no longer appeared on the edit post pages.
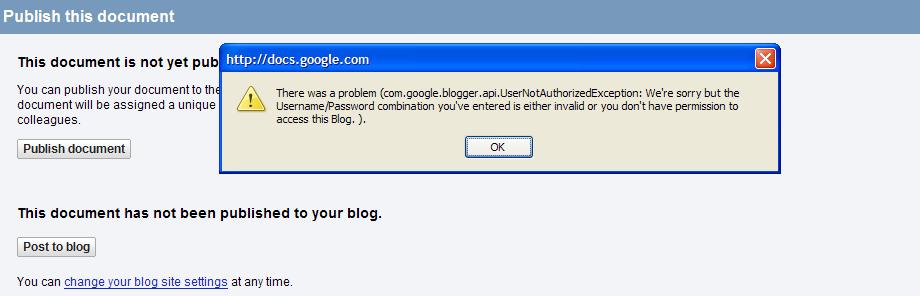
Once this service is ready for blogger beta, I need to check how this thing works with the tables. If you are used to copy-pasting text from Microsoft Word you might remember that tables cannot be pasted into the post editor in blogger.
2. Formating issues with spreadsheets [Updated (14th Oct, 12:36)]

There are formatting issues with imported Excel files (as seen in the images above).
3. Issues with Spellcheck
I noticed that the spell check is not up to the mark:
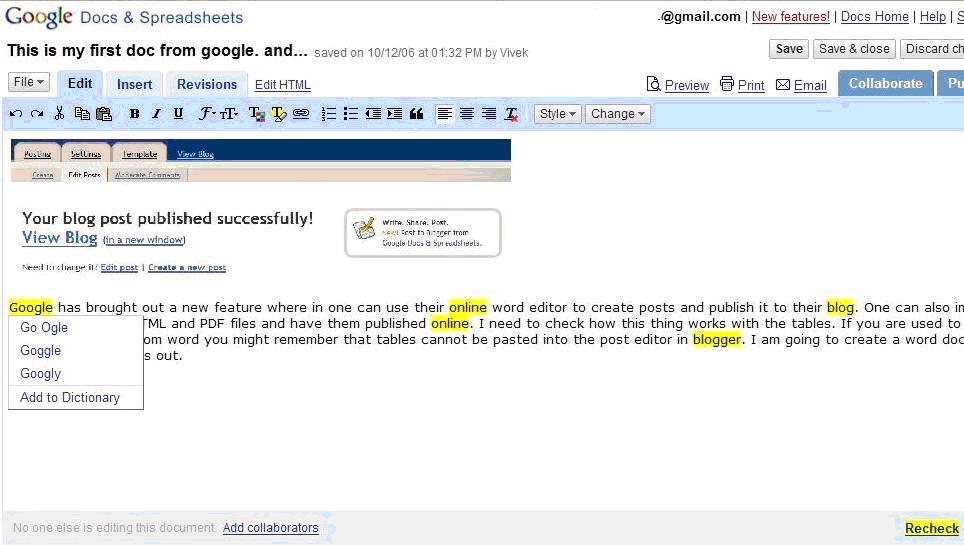 Google needs to fix this problem at the earliest, because if any bloggers were to use this service, the bare-minimum they will look for is proper functioning of basic features like spell-check.
Support
Other than the usual support by Google, there is a Google help group for Google Docs & Spreadsheets, where you can post you questions, concerns and suggestions regarding this service and share your experiences with other users.
Conclusion
Google Docs & Spreadsheets is a powerful software/service but lots of errors and problems need to be ironed out before its ready for use (thats why its in beta stage). In a recent news article, I had read that Google's CEO Eric Schmidt wants his developers to focus on improving current software/services. I couldn't agree with him more. In the recent years, Google has brought out a range of powerful softwares and services from its labs but its the continuing improvement, feature additions and support for these services that will win the day for it.
Update (Nov 12, 2006 IST): It appears that the connectivity problems between Google Docs & Spreadsheets and Blogger Beta is now fixed. So go ahead try using this service now.
Thursday, October 12, 2006
Google blog ping service in FeedBurner
Hello Friends,
While browsing though A consuming Experince, I came across this post regarding Google Blog ping service being added to FeedBurner's PingShot utility.
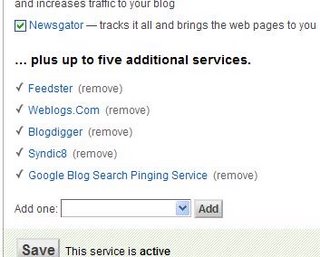
You might want to add this option to your FeedBurner feeds to increase the chances of appearing prominently in Google search.
While browsing though A consuming Experince, I came across this post regarding Google Blog ping service being added to FeedBurner's PingShot utility.

You might want to add this option to your FeedBurner feeds to increase the chances of appearing prominently in Google search.
Monday, October 09, 2006
Now about phishing
I wrote a post on spam, praised Gmail and now I get a phishing e-mail that even Gmail couldn’t block.
Whosoever wrote that mail was such a dumbo. It had a glaring spelling mistake. They “tanked” me for my patience :)). Here is a picture of the e-mail with a link pointing to a bank’s website. The link appears to be legitimate and normal at first glance.
And once I hovered my mouse cursor over the link, the real link underneath was revealed. Also, observe the “Tank” right underneath (lolz)
To know more about phishing check this wikipedia page. Until next time.
Whosoever wrote that mail was such a dumbo. It had a glaring spelling mistake. They “tanked” me for my patience :)). Here is a picture of the e-mail with a link pointing to a bank’s website. The link appears to be legitimate and normal at first glance.

And once I hovered my mouse cursor over the link, the real link underneath was revealed. Also, observe the “Tank” right underneath (lolz)

To know more about phishing check this wikipedia page. Until next time.
Sunday, October 08, 2006
Do spammers use crawlers like search engines do?
Hello all,
I have been receiving a huge number of spam E-mails in my inbox and I was wondering how these spammers work.
I don't know much about how spammers work and the title of this post might sound crazy. Those who have been following my blog closely might have noticed that I have changed the default e-mail address associated with this blog. The reason was incredible amount of spam in my Gmail inbox. However, Gmail is very smart and it keeps the crap in the crap box (spam folder) but still one thing I do not understand is that how do so many people (assuming that each spam mail comes from a different person/machine) actually pickup e-mail addresses from so many blogs and websites and spam those addresses. It looks like spamming is their sole profession :))
I had only recently removed my original e-mail address, put a new e-mail address in my profile and on the blog and boom! The spam count is running into hundreds already. I was wondering if these guys use crawlers to hunt for mailto: href tags in the HTML code and pickup the e-mail address there in to spam the user's brains out.
Update (8th Oct, 15:23)
I found this article on howstuffworks.com where in its mentioned that spammers use a spidering technology popularly called spambots.
"The second source for e-mail addresses is the Web itself. There are tens of millions of Web sites, and spammers can create search engines that spider the Web specifically looking for the telltale "@" sign that indicates an e-mail address. The programs that do the spidering are called spambots." - howstuffworks.com
Great! What I was imagining, turns out to be old school stuff. Smart spammers, eh?
Saturday, October 07, 2006
Comment Feed for individual posts (updated)
I am not sure if this is a new feature or an old one that I missed. I was moderating comments on one of my recent posts when I came across this feed link under the post. It is a feed to the comments that appear only on that individual post (not the entire blog).
To view this feed link just click on your post’s title (for example you can click on “Comment Feed for individual posts” in this post), and scroll down to see the following text:
“Subscribe to: Post Comments (Atom)”
This appears on posts that have comments as well as the ones that have no comments.
The hack
For people who have removed (or wish to remove coz they use feedburner etc) the “Subscribe to: Posts (Atom)” link (that appears at the bottom of the posts section on the blog’s main page), this comment feed link will not appear on the post page. Here is a work around to have the comment feed link displayed while keeping your main page settings intact.
It requires a very small modification to your blog's template. So, if you do not wish to display the “Subscribe to: Posts(Atom)” link at the bottom of the main page but still want to display the comment feed link to an individual post on that post's page, add the lines in bold to the code in your blog:
<b:if cond='data:blog.pageType == "item"'>
<div class='feed-links'>
Subscribe to:
<b:loop values='data:links' var='f'>
<a class='feed-link' expr:href='data:f.url' expr:type='data:f.mimeType' target='_blank'><data:f.name/> (<data:f.feedType/>)</a>
</b:loop>
</div>
</b:if>
It is a simple “if” condition and to work with it you need to search for “ class='feed-links' ” and add the code in bold as shown here.
How do they make it work for an individual posts?
I don’t really know that, but let’s look at the URLs of the feeds:
Comments feed my previous post:
http://stubborn-fanatic.blogspot.com/feeds/2189603568115404259/
comments/full
Comments feed for this post:
http://stubborn-fanatic.blogspot.com/feeds/2453519588050438240/
comments/full
I am not sure what these numbers i.e. “2189603568115404259” and “2453519588050438240” are. I guess they refer to the total number of posts in all the blogs on blogger at the particular moment when you create a post (your post's simplest possible unique-ID across the entire blogger i.e. your post number). I am also not sure of this feed's exact purpose. Few people, who tend to have an elaborate discussion on a particular post, might prefer to use such a feed, otherwise I see no use. Whatever it is, it sounds like a good feature. Its presence might be useful to certain readers and its absence does no harm.
Update: I have replaced <b:if cond='data:blog.homepageUrl != data:blog.url'> in the above hack with <b:if cond='data:blog.pageType == "item"'> because the blog's default feed link was not displaying on the main page but still displaying on the label and archive pages.
Friday, October 06, 2006
Blogger template anatomy (non-beta bloggers)
Hello readers,
I was browsing through instabloke and in it I came across a link which contains a very good explanation of a non beta blogger template. If one wishes to learn blog hacking, one must know thy template well. I recommend you go through this article to learn more.
The writer(s) have actually use a picture of a sample blog and provided each section of the blog with its relevant CSS and HTML code. In addition, I also like their blog's design and certain page elements. Good work done by the author(s)!
Subscribe to:
Posts (Atom)
Subscribe to my Newsfeeds:


This work is licensed under a
Creative Commons Attribution-ShareAlike 2.5 License.
Note: The author is not responsible for any loss of data or damages to your homepage as a result of using the hacks suggested here. Please observe all necessary precautions while modifying template code.
© 2006 Vivek Sanghi a.k.a Stubborn-Fanatic