Hello readers. I have decided to move to custom hosting for this blog. Many of you might have noticed that yesterday stubborn-fanatic.blogspot.com was redirecting to techblog.viveksanghi.com. This was to test whether things were working fine. Once my tests are completed, I have decided to move ahead with custom hosting.
Once I move to custom hosting, my blogspot blog will no longer be accessible to visitors. At techblog.viveksanghi.com I use a wordpress template and its all based on the wordpress platform. However, all my posts from this blog will be available there are well. Those of you who were looking at my blogspot template for design ideas will be unable to do so any more. However I can send you this entire template code for a nominal payment of $2 via paypal only. If you are interested, please contact me at stubb [dot] fanatic [at] gmail [dot] com
(Please leave a comment if you do not want me to redirect this blog to the new address)
In addition, I would also like to inform everybody that I will be shifting my focus on wordpress platform and will not post any new hacks for the blogger. However I will continue to support readers with their queries on the existing hacks (subject to availability of time).
Please feel free to comment/suggest and also have a look at techblog.viveksanghi.com.
Sunday, December 21, 2008
Thursday, May 15, 2008
Contest Suggestion: 31 Days of the Dragon
'lo. After a long time I am posting some thing here for you guys. I hope until now you have enjoyed the existing set of Blogger mods that I had published. While this is not related to blogger mods, I am sure those of you who were unaware, will definitely love it. The other day I came across a big contest while browsing some of sites I read regularly, and simply could not resist sharing it with you.

HP (in association with Buzz Corps)is promoting its latest 20.1" notebook i.e. The HP HDX Entertainment Notebook using a contest called "The 31 Days of Dragon". Before I proceed further note that this contest is open to everyone from any part of the world.
Contest Info: There are 31 participating web sites, with the sponsorship of HP where HP is working with them to offer 31 prize packages - one a day for 31 days during a period from 09 May through 08 June 2008. Here are the details of the price package (which btw is worth well over USD 5000 in retail value):
13 May - 20 May www.geekstogo.com
14 May - 21 May bink.nu
15 May - 22 May www.mediablab.com
16 May - 23 May www.last100.com
17 May - 24 May www.labnol.org
18 May - 25 May www.notebooks.com
19 May - 26 May www.slashdotreview.com
20 May - 27 May www.neowin.net
21 May - 28 May www.geek.com
22 May - 29 Mau www.lockergnome.com
23 May - 30 May www.planetx64.com
24 May - 31 May www.thegreenbutton.com
25 May - 01 Jun www.istartedsomething.com
26 May - 02 Jun www.bleepingcomputer.com
27 May - 03 Jun www.hardwaregeeks.com
28 May - 04 Jun www.geeknewscentral.com
29 May - 05 Jun www.geekzone.co.nz
30 May - 06 Jun www.thetabletpc.net
31 May - 07 Jun www.gearlive.com
01 Jun - 08 Jun www.gottabemobile.com
Some of the website site where the winners have already been declared are:
02 May - 09 May www.absolutevista.com
03 May - 10 May www.arstechnica.com
04 May - 11 May www.osnn.net
05 May - 12 May www.jkontherun.com
06 May - 13 May digitalmediaphile.wordpress.com
07 May - 14 May www.bostonpocketpc.com
08 May - 15 May www.the-gadgeteer.com
09 May - 16 May www.thedigitallifestyle.com
10 May - 17 May www.digitalhomethoughts.com
11 May - 18 May www.windows-now.com
12 May - 19 May www.windowsconnected.com
So I suggest you to head over to these website and track them to win the super prize package. For details about the contest please visit here. There is an RSS link and an OPML available so that you can track these sites conveniently.
In addition, most of these site have very good articles which techies and computer enthusiasts will definitely like. So go now and start participating, I am also competing :)

HP (in association with Buzz Corps)is promoting its latest 20.1" notebook i.e. The HP HDX Entertainment Notebook using a contest called "The 31 Days of Dragon". Before I proceed further note that this contest is open to everyone from any part of the world.
Contest Info: There are 31 participating web sites, with the sponsorship of HP where HP is working with them to offer 31 prize packages - one a day for 31 days during a period from 09 May through 08 June 2008. Here are the details of the price package (which btw is worth well over USD 5000 in retail value):
- Display: 20.1″ diagonal WUXGA High-Definition HP Ultra Brightview Widescreen (1920×1200)
- Operating system: Windows Vista Ultimate (64-bit)
- Processor: Intel Core2 Extreme Processor X9000 (2.80GHz, 6MB L2 Cache, 800MHz FSB)
- Memory: 4GB DDR2 System Memory (2 Dimm)
- Graphics Card: 512MB NVIDIA GeForce 8800M GTS
- Personalization: HP Imprint Finish (Dragon) + Fingerprint Reader + Webcam + Microphone
- Networking: Intel(R) PRO/Wireless 4965AGN Network Connection and Bluetooth(TM)
- Hard Drive: 500GB 5400RPM SATA Dual Hard Drive (250GB x 2)
- Optical: Blu-Ray ROM with SuperMulti DVD+/-R/RW Double Layer
- TV & Entertainment Experience: Integrated HP HDTV Hybrid TV Tuner and 4 Altec Lansing speakers + the HP Triple Bass Reflex subwoofer
- Primary Battery: 9 Cell Lithium Ion Battery
- Productivity Applications: Microsoft Office 2007, Corel PaintShop Pro Photo X2, Corel Painter 4, Ulead VideoStudio 11.5 Plus
- Games: Viva Pinata, Microsoft Flight Simulator X, Microsoft Flight Simulator X Acceleration Expansion Pack, Gear of War
- Blu-Ray movies: The Pirates of the Caribbean Trilogy – The Curse of the Black Pearl, Dead Man's Chest, At World's End.
13 May - 20 May www.geekstogo.com
14 May - 21 May bink.nu
15 May - 22 May www.mediablab.com
16 May - 23 May www.last100.com
17 May - 24 May www.labnol.org
18 May - 25 May www.notebooks.com
19 May - 26 May www.slashdotreview.com
20 May - 27 May www.neowin.net
21 May - 28 May www.geek.com
22 May - 29 Mau www.lockergnome.com
23 May - 30 May www.planetx64.com
24 May - 31 May www.thegreenbutton.com
25 May - 01 Jun www.istartedsomething.com
26 May - 02 Jun www.bleepingcomputer.com
27 May - 03 Jun www.hardwaregeeks.com
28 May - 04 Jun www.geeknewscentral.com
29 May - 05 Jun www.geekzone.co.nz
30 May - 06 Jun www.thetabletpc.net
31 May - 07 Jun www.gearlive.com
01 Jun - 08 Jun www.gottabemobile.com
Some of the website site where the winners have already been declared are:
02 May - 09 May www.absolutevista.com
03 May - 10 May www.arstechnica.com
04 May - 11 May www.osnn.net
05 May - 12 May www.jkontherun.com
06 May - 13 May digitalmediaphile.wordpress.com
07 May - 14 May www.bostonpocketpc.com
08 May - 15 May www.the-gadgeteer.com
09 May - 16 May www.thedigitallifestyle.com
10 May - 17 May www.digitalhomethoughts.com
11 May - 18 May www.windows-now.com
12 May - 19 May www.windowsconnected.com
So I suggest you to head over to these website and track them to win the super prize package. For details about the contest please visit here. There is an RSS link and an OPML available so that you can track these sites conveniently.
In addition, most of these site have very good articles which techies and computer enthusiasts will definitely like. So go now and start participating, I am also competing :)
Thursday, January 04, 2007
Poll result
I had conducted the following poll a couple of months ago on my blog, but forgot to post the poll results after ending the poll. Better late than never:


Monday, January 01, 2007
Translate your posts into 14 languages (Updates added)
Dear Friends,
This is my first add-on goody for the year 2007. Hope you will like it. Brainiac came up with a suggestion to add more languages to my Google translate for posts hack. As the number of languages provided by Google is limited, I decided to use the BabelFish code, offered in a language translation widget by Amit Agarwal of Digital Inspiration. I have been using this hack in the "Translate" section of my navigational bar (at the top of the page).
- This code offers 14 languages, to which your readers will be able to translate your posts.
- There is also some translation code that Spanish Bloggers can use to allow their readers to read their blogs in English, French, Russian, German and Italian.
(See comments for credits)
I have modified that code so that you can use it in your post footers and allow your readers to translate individual posts (if they like). To learn how to add some thing to your template's post footers, visit this page.
Update: Added code for English to Trukish courtesy emrex
Update: Some translate links for Spanish bloggers (based on a wordpress plugin pointed out by brainiac):
If you want to display only the flag images, simply delete the text between the img tag and the </a> tag. In case you want to have only the text, remove the img tag completely. As always, don't forget to make a backup of your template before applying this code.
Please drop a line here if you find some bug or if some thing doesn't work. I have not tested out most of the code.
Also, Deniz of imessengr is now offering a modded three-column Thisaway template loaded with popular hacks. Visit his page to learn more and download the template.
This is my first add-on goody for the year 2007. Hope you will like it. Brainiac came up with a suggestion to add more languages to my Google translate for posts hack. As the number of languages provided by Google is limited, I decided to use the BabelFish code, offered in a language translation widget by Amit Agarwal of Digital Inspiration. I have been using this hack in the "Translate" section of my navigational bar (at the top of the page).
- This code offers 14 languages, to which your readers will be able to translate your posts.
- There is also some translation code that Spanish Bloggers can use to allow their readers to read their blogs in English, French, Russian, German and Italian.
(See comments for credits)
I have modified that code so that you can use it in your post footers and allow your readers to translate individual posts (if they like). To learn how to add some thing to your template's post footers, visit this page.
Update: Added code for English to Trukish courtesy emrex
<a expr:href='"http://66.94.231.168/babelfish/translate_url_content?trurl=" + data:post.url + "&lp=en_nl"' title='Nederlands/Dutch'><img alt='Nederlands/Dutch' height='20' src='http://photos1.blogger.com/blogger/3709/485/400/nl.gif' width='30'/> Nederlands</a> |
<a expr:href='"http://66.94.231.168/babelfish/translate_url_content?trurl=" + data:post.url + "&lp=en_fr"' title='Français/French'><img alt='Français/French' height='20' src='http://photos1.blogger.com/img/43/1633/320/13539949_e76af75976.jpg' width='30'/> Français</a> |
<a expr:href='"http://66.94.231.168/babelfish/translate_url_content?trurl=" + data:post.url + "&lp=en_ru"' title='Русский/Russian'><img alt='Русский/Russian' height='20' src='http://photos1.blogger.com/blogger/3709/485/1600/ru.gif' width='30'/> Русский</a> |
<a expr:href='"http://66.94.231.168/babelfish/translate_url_content?trurl=" + data:post.url + "&lp=en_de"' title='Deutsch/German'><img alt='Deutsch/German' height='20' src='http://photos1.blogger.com/img/43/1633/320/13539933_041ca1eda2.jpg' width='30'/> Deutsch</a> |
<a expr:href='"http://66.94.231.168/babelfish/translate_url_content?trurl=" + data:post.url + "&lp=en_it"' title='Italiano/Italian'><img alt='Italiano/Italian' height='20' src='http://photos1.blogger.com/img/43/1633/320/13539953_0384ccecf9.jpg' width='30'/> Italiano</a> |
<a expr:href='"http://66.94.231.168/babelfish/translate_url_content?trurl=" + data:post.url + "&lp=en_pt"' title='Português/Portuguese'><img alt='Português/Portuguese' height='20' src='http://photos1.blogger.com/img/43/1633/320/13539966_0d09b410b5.jpg' width='30'/> Português</a> |
<a expr:href='"http://66.94.231.168/babelfish/translate_url_content?trurl=" + data:post.url + "&lp=en_es"' title='Español/Spanish'><img alt='Español/Spanish' height='20' src='http://photos1.blogger.com/img/43/1633/320/13539946_2fabed0dbf.jpg' width='30'/>Español</a> |
<a expr:href='"http://translate.google.com/translate?hl=ar&ie=UTF-8&oe=UTF-8&langpair=en|ar&u=" + data:post.url' title='العربية/Arabic'><img alt='العربية/Arabic' border='0' height='20' src='http://www.google.com/images/flags/sa_flag.gif' width='30'/> العربية</a> |
<a expr:href='"http://66.94.231.168/babelfish/translate_url_content?trurl=" + data:post.url + "&lp=en_el"' title='Ελληνικά/Greek'><img alt='Ελληνικά/Greek' height='20' src='http://photos1.blogger.com/blogger/3709/485/1600/el.gif' width='30'/> Ελληνικά</a> |
<a expr:href='"http://66.94.231.168/babelfish/translate_url_content?trurl=" + data:post.url + "&lp=en_ja"' title='日本語/Japanese'><img alt='Japanese' height='20' src='http://photos1.blogger.com/img/43/1633/320/13539955_925e6683c8.jpg' width='30'/> 日本語</a> |
<a expr:href='"http://66.94.231.168/babelfish/translate_url_content?trurl=" + data:post.url + "&lp=en_ko"' title='한국어/Korean'><img alt='Korean' height='20' src='http://photos1.blogger.com/img/43/1633/320/13539958_3c3b482c95.jpg' width='30'/> 한국어</a> |
<a expr:href='"http://66.94.231.168/babelfish/translate_url_content?trurl=" + data:post.url + "&lp=en_zh"' title='汉语简化了/Chinese Simplified'><img alt='Chinese Simplified' height='20' src='http://photos1.blogger.com/img/43/1633/320/14324441_5ca5ce3423.jpg' width='30'/> 汉语简化了</a> |
<a expr:href='"http://66.94.231.168/babelfish/translate_url_content?trurl=" + data:post.url + "&lp=en_zt"' title='中國傳統/Chinese Traditional'><img alt='Chinese Traditional' height='20' src='http://photos1.blogger.com/blogger/3709/485/400/zh_tw.gif' width='30'/> 中國傳統</a>
Update: Added code for English to Trukish
<a expr:href='"http://babel.gts-translation.com/geturl?direction=50&input_url=" + data:post.url' title='Türkçe/Turkish'><img src='[Image not available]' alt='Turkish' height='20' width='30'/>Türkçe</a>
Update: Some translate links for Spanish bloggers (based on a wordpress plugin pointed out by brainiac):
<a expr:href='"http://world.altavista.com/babelfish/trurl_pagecontent?url=" + data:post.url + "&lp=es_en"' title='Spanish to English'><img src='http://bp0.blogger.com/_XGtsagQTuUQ/RZk8DP2JNiI/AAAAAAAAADk/eRxHS5s1f10/s320/english.jpg' alt='Eng' /> English</a>
<a expr:href='"http://www1.worldlingo.com/SH0gfCf2o9dM33sw2faPEI,6sc5M9NFT0/translation?wl_url=" + data:post.url + "&wl_srclang=ES&wl_trglang=fr" title='Spanish to French'><img src='http://bp1.blogger.com/_XGtsagQTuUQ/RZk8Df2JNjI/AAAAAAAAADs/jL1jKBhgKFc/s320/france.gif' />Français</a>
<a expr:href='"http://www1.worldlingo.com/SH0gfCf2o9dM33sw2faPEI,6sc5M9NFT0/translation?wl_url=" + data:post.url + "&wl_srclang=ES&wl_trglang=de"' title='Spanish to German'><img src='http://bp1.blogger.com/_XGtsagQTuUQ/RZk8Df2JNkI/AAAAAAAAAD0/JubAGPyc5d4/s320/germany.gif' />Deutsch</a>
<a expr:href='"http://www1.worldlingo.com/SH0gfCf2o9dM33sw2faPEI,6sc5M9NFT0/translation?wl_url=" + data:post.url + "&wl_srclang=ES&wl_trglang=it"' title='Spanish to Italian'><img src='http://bp3.blogger.com/_XGtsagQTuUQ/RZk8Q_2JNmI/AAAAAAAAAEE/pJodrosGp8I/s320/italy.gif' />Italiano</a>
<a expr:href='"http://www1.worldlingo.com/SH0gfCf2o9dM33sw2faPEI,6sc5M9NFT0/translation?wl_url=" + data:post.url + "&wl_srclang=ES&wl_trglang=ru"' title='Spanish to Russian'><img src='http://bp0.blogger.com/_XGtsagQTuUQ/RZk8RP2JNpI/AAAAAAAAAEc/Tnq_uTX3WhY/s320/russia.gif' />Русский</a>
If you want to display only the flag images, simply delete the text between the img tag and the </a> tag. In case you want to have only the text, remove the img tag completely. As always, don't forget to make a backup of your template before applying this code.
Please drop a line here if you find some bug or if some thing doesn't work. I have not tested out most of the code.
Also, Deniz of imessengr is now offering a modded three-column Thisaway template loaded with popular hacks. Visit his page to learn more and download the template.
Sunday, December 31, 2006
More hackers now on the 'new blogger' hacking scene
Hello Readers,
Life has been very busy for me in the last couple of weeks and therefore I have not been posting any new hacks or code. However, the the hacking scene has not gone cold. Lots of stuff has been happening in the blogger hacking space.
1. You might have looked at Ramani's lightining fast Neo template. If not check it out here.
2. Classic Blogger's favorite hacker, Aditya of last word has moved to the new blogger and is now making hack for the new platform. Check out his page here (looks great!).
3. Deepak of Blogger Hacked is spinning out quality Ajax based hacks also displaying strong coding skills. I highly recommend checking out his hacks.
That's what I have noticed recently. Hope this keeps you busy for sometime! Happy hacking and a very happy 2007.
Life has been very busy for me in the last couple of weeks and therefore I have not been posting any new hacks or code. However, the the hacking scene has not gone cold. Lots of stuff has been happening in the blogger hacking space.
1. You might have looked at Ramani's lightining fast Neo template. If not check it out here.
2. Classic Blogger's favorite hacker, Aditya of last word has moved to the new blogger and is now making hack for the new platform. Check out his page here (looks great!).
3. Deepak of Blogger Hacked is spinning out quality Ajax based hacks also displaying strong coding skills. I highly recommend checking out his hacks.
That's what I have noticed recently. Hope this keeps you busy for sometime! Happy hacking and a very happy 2007.
Sunday, December 24, 2006
Tamed rounders template now hacked and downloadable
Hello all,
Deniz of imessengr has taken the three column rounders template and hacked it to include most of the popular hacks currently available for the new Blogger. He has done this for all the variants of rounders that are available on Blogger.
Visit here to download this template and install it in your blog.
Deniz of imessengr has taken the three column rounders template and hacked it to include most of the popular hacks currently available for the new Blogger. He has done this for all the variants of rounders that are available on Blogger.
Visit here to download this template and install it in your blog.
Thursday, December 21, 2006
Blogger Feature or Bug: Edit link disappears and Blog unable to recognize its admin
For quite a while now I have been facing problems with my Blogger blogs and layout editor. Every time I edit a widget and save the changes the edit link for that widget disappears from the layout. To understand what I am referring to have a look at the two images below.


Once I update the "Subscribe | Syndicate | Bookmark" widget the edit link disappears. I actually have to click on the page elements link to reload the layout editor which is very irritating. I have not heard anyone else complain about this so I wonder if only I am facing this problem or if this is some cool new Blogger feature that I don't understand :)
Not just this, for some strange reason, my blogs don't identify me as the administrator even if I am logged into blogger. There is a possibility that the widget quickedit links are not shown as I might have messed up some code in the template. But that's not the case as I don't get to see those links even in any new blogs (where the HTML has not been touched) created by me. Anyone else facing this problem? Anyone has any suggestions?


Once I update the "Subscribe | Syndicate | Bookmark" widget the edit link disappears. I actually have to click on the page elements link to reload the layout editor which is very irritating. I have not heard anyone else complain about this so I wonder if only I am facing this problem or if this is some cool new Blogger feature that I don't understand :)
Not just this, for some strange reason, my blogs don't identify me as the administrator even if I am logged into blogger. There is a possibility that the widget quickedit links are not shown as I might have messed up some code in the template. But that's not the case as I don't get to see those links even in any new blogs (where the HTML has not been touched) created by me. Anyone else facing this problem? Anyone has any suggestions?
Wednesday, December 20, 2006
Blogger News: Welcome the "New Blogger"
Hello Readers,
Just a quick update here. Blogger has announced that they are now out of beta. This is shown by the change of URLs. The sign-in link on beta blog navbars no longer points to the beta.blogger.com link. It now points to www2.blogger.com.
Classic Blogger users can learn more aboutBlogger Beta the New Blogger here.
Just a quick update here. Blogger has announced that they are now out of beta. This is shown by the change of URLs. The sign-in link on beta blog navbars no longer points to the beta.blogger.com link. It now points to www2.blogger.com.
Classic Blogger users can learn more about
Saturday, December 16, 2006
Adsense inside your posts and only on post (item) pages
Loui$$ from Blogging Secret just asked me how I was displaying adsense ads only on post (item) pages and inside the post i.e. in the beginning and the end of each post. For this I use the same if statements from my hack Display widgets only on pages you prefer but widget are not involved in this one as widgets cannot go inside a post.
First let me acknowledge the sources from which I learnt some essential adsense tricks for Blogger Beta:
1. Using adsense code in beta template by Loui$$.
2. Using adsense in posts by Deniz.
I recommend checking those out before proceeding with this hack. As always, please back-up your template before proceeding with this hack as you will be modifying some important portions of your template. Now for the hack. Simply look for:
<p><data:post.body/></p>
in your template's <div class='post'> section and replace it with the code given in code boxes below:
([Your Adsense] in the each of codes given below must be replaced with the adsense code of your choice)
1. This code:
(if you are not using any hacks like peek-a-boo posts, selective expandable posts or peek-a-boo on label, archive and search pages)
2. This code in bold-italic (If you are using Peek-a-boo posts hacks)
(If you are also using the peek-a-boo on label and search pages hack, then there may be some confusion regarding which <p><data:post.body/></p> must be replaced with the code given below. Therefore, I have included the peek-a-boo code as well so that you can easily locate the correct instance of data:post.body/ in your template.)
3. This code in bold-italic (If you are using selective expandable posts hack)
Hope this becomes the tipping point in your adsense revenues graph :D
First let me acknowledge the sources from which I learnt some essential adsense tricks for Blogger Beta:
1. Using adsense code in beta template by Loui$$.
2. Using adsense in posts by Deniz.
I recommend checking those out before proceeding with this hack. As always, please back-up your template before proceeding with this hack as you will be modifying some important portions of your template. Now for the hack. Simply look for:
<p><data:post.body/></p>
in your template's <div class='post'> section and replace it with the code given in code boxes below:
([Your Adsense] in the each of codes given below must be replaced with the adsense code of your choice)
1. This code:
(if you are not using any hacks like peek-a-boo posts, selective expandable posts or peek-a-boo on label, archive and search pages)
      <b:if cond='data:blog.pageType == "item"'>
        <p><table align='center'><tr><td>
<center>[Your Adsense]</center></td></tr></table>
<data:post.body/><table align='center'><tr><td>
<center>[Your Adsense]</center></td></tr></table></p>
      <b:else/>
<p><data:post.body/></p>
      </b:if>
2. This code in bold-italic (If you are using Peek-a-boo posts hacks)
(If you are also using the peek-a-boo on label and search pages hack, then there may be some confusion regarding which <p><data:post.body/></p> must be replaced with the code given below. Therefore, I have included the peek-a-boo code as well so that you can easily locate the correct instance of data:post.body/ in your template.)
<div class='post-body' expr:id='"post-" + data:post.id'>
<b:if cond='data:blog.pageType == "item"'>
<p><table align='center'><tr><td>
<center>Your Adsense</center></td></tr></table>
<data:post.body/><table align='center'><tr><td>
<center>Your Adsense</center></td></tr></table></p>
<b:else/>
<style>#fullpost {display:none;}</style>
<p><data:post.body/></p>
<span id='showlink'>
<p><a expr:onclick='"javascript:showFull(\"post-" + data:post.id + "\");"' href='javascript:void(0);'>Continue reading...</a></p>
</span>
<span id='hidelink' style='display:none'>
<p><a expr:onclick='"javascript:hideFull(\"post-" + data:post.id + "\");"' href='javascript:void(0);'>Excerpts only...</a></p>
</span>
<script type='text/javascript'>checkFull("post-" + "<data:post.id/>")</script>
</b:if>
<div style='clear: both;'/> <!-- clear for photos floats -->
</div>
3. This code in bold-italic (If you are using selective expandable posts hack)
<div class='post-body' expr:id='"post-" + data:post.id'>
<b:if cond='data:blog.pageType == "item"'>
<style>#fullpost{display:inline;}</style>
<p><table align='center'><tr><td>
<center>[Your Adsense]</center></td></tr></table>
<data:post.body/><br/>
<table align='center'><tr><td><center>
[Your Adsense]</center></td></tr></table></p>
<b:else/>
<style>#fullpost{display:none;}</style>
<p><data:post.body/></p>
<span id='showlink'>
<a expr:href='data:post.url'>Read More......</a>
</span>
<script type='text/javascript'>
checkFull("post-" + "<data:post.id/>");
</script>
</b:if>
<div style='clear: both;'/> <!-- clear for photos floats -->
</div>
Hope this becomes the tipping point in your adsense revenues graph :D
Friday, December 15, 2006
Add background colors to comments
Hi all,
This is a quick & dirty or a simple hack (if you want to call it that) that allows one to add a background color to the comments. I have this set in my blog and you can simply check the post page for one of my posts that has comments to see what I am talking about. Here is an image for your convenience:

Interested? Please backup your template before proceeding with this hack.
In this hack you can assign a different background color (and text color) for the blog author’s comments (see the image above) and to do this you must have this Hack (Author comment highlighting) from Hackosphere installed.
Once you install the author comment highlighting hack from Hackosphere, your comment code will look similar to this:
Now check out this modified code. As the comment section CSS may differ across various templates, do not copy-paste the entire code. Understand and pick up the changes shown in italic-bold (and annotated for reference). Also Checkout the image below to see what I mean by comment header, comment body and comment footer in my annotations.

To pick up color hex values that suit your blog you can refer to this link. This is a simple tutorial on how to modify your comment section. You can add a whole lot of CSS to make it look better. Do drop a line here if you are able to create anything good looking based on these lines.
This is a quick & dirty or a simple hack (if you want to call it that) that allows one to add a background color to the comments. I have this set in my blog and you can simply check the post page for one of my posts that has comments to see what I am talking about. Here is an image for your convenience:

Interested? Please backup your template before proceeding with this hack.
In this hack you can assign a different background color (and text color) for the blog author’s comments (see the image above) and to do this you must have this Hack (Author comment highlighting) from Hackosphere installed.
Once you install the author comment highlighting hack from Hackosphere, your comment code will look similar to this:
/* Comments
----------------------------------------------- */
#comments {
 margin:0;
 }
#comments h4 {
 margin:0 0 10px;
 border-top:1px dotted $borderColor;
 padding-top:.5em;
 line-height: 1.4em;
 font: bold 110% Georgia,Serif;
 color:#333;
 }
#comments-block {
 line-height:1.6em;
 }
.comment-author {
 background:url("http://www.blogblog.com/dots/icon_comment.gif") no-repeat 2px .35em;
 margin:.5em 0 0;
 padding:0 0 0 20px;
 font-weight:bold;
 }
.comment-body {
 margin:0;
 padding:0 0 0 20px;
 }
.comment-body p {
 margin:0 0 .5em;
 }
.comment-body-author {
 margin:0;
 padding:0px 0px 0px 20px;
}
.comment-body-author p {
 font-size:100%;
 margin:0 0 .2em 0;
 color:#000000;
 text-decoration:bold;
}
.comment-footer {
 margin:0 0 .5em;
 padding:0 0 .75em 20px;
 color:#996;
 }
.comment-footer a:link {
 color:#996;
 }
.deleted-comment {
 font-style:italic;
 color:gray;
 }
Now check out this modified code. As the comment section CSS may differ across various templates, do not copy-paste the entire code. Understand and pick up the changes shown in italic-bold (and annotated for reference). Also Checkout the image below to see what I mean by comment header, comment body and comment footer in my annotations.
/* Comments
----------------------------------------------- */
#comments {
 margin:0;
 }
#comments h4 {
 margin:0 0 10px;
 border-top:1px dotted #99bb99;
 padding-top:.5em;
 line-height: 1.4em;
 font: bold 110% Georgia,Serif;
 color:#333;
 }
#comments-block {
 line-height:1.6em;
 }
.comment-author {
 background:#CCFFCC /*comment header background color (comment author name)*/
url("http://www.blogblog.com/dots/icon_comment.gif") no-repeat 2px .35em;
 margin:.5em 0 0;
 padding:0 0 0 20px;
 font-weight:bold;
 }
.comment-body {
 background:#99FFFF; /*Reader comment background color*/
 margin:0;
 padding:7px 7px 7px 7px; /*Modified padding values*/
 }
.comment-body p {
 margin:0 0 .5em;
 }
.comment-body-author {
 background:#cccccc; /*The author comments background color.*/
 margin:0;
 padding:7px 7px 7px 10px; /*Modified padding values*/
}
.comment-body-author p {
 font-size:105%;
 margin:0 0 .2em 0;
 color:#6728B2; /*The author comments text color.*/
 text-decoration:bold;
}
.comment-footer {
 background:#CCFFCC; /*Comment footer background color (comment permalink)*/
 margin:0 0 .5em;
 padding:0 0 .75em 20px;
 color:#996;
 }
.comment-footer a:link {
 color:#996;
 }
.deleted-comment {
 font-style:italic;
 color:gray;
 }

To pick up color hex values that suit your blog you can refer to this link. This is a simple tutorial on how to modify your comment section. You can add a whole lot of CSS to make it look better. Do drop a line here if you are able to create anything good looking based on these lines.
Thursday, December 14, 2006
Google page creator: headache
Google's Page Creator software is seriously pissing me off:

I hope I don't end up breaking my monitor, keyboard or mouse the next time I see this:

BTW Google should hire someone who has written error messages for Microsoft :)) Coz: "oops! I don't like your error messages". Better still don't give me the donuts, just get the page working. Just a thought (pun intended)
Update: Page creator behaves much better after I turned off the experimental features.

I hope I don't end up breaking my monitor, keyboard or mouse the next time I see this:

BTW Google should hire someone who has written error messages for Microsoft :)) Coz: "oops! I don't like your error messages". Better still don't give me the donuts, just get the page working. Just a thought (pun intended)
Update: Page creator behaves much better after I turned off the experimental features.
Monday, December 11, 2006
Hack Round-up
Hello Readers,
Well, I had no new ideas (except for a few which require CSS knowledge) so I have no new hacks of my own as of now. However, this post points to some good hacks/add-ons/template mods that I have seen in the neighborhood recently:
1. Hacked Son of Moto template by Deniz of imessengr.
2. Adsense beside your posts in blogger beta by Deniz of imessengr.
3. Adsense between the posts (adding adsense directly to the beta template) by Loui$$ of Blogging No Secret.
4. Template theme switcher (and tutorial to host Blogger Beta CSS externally) and hacked Blogger templates with this functionality (inbuilt) by PurpleMoggy.
In addition, I have found my interaction with Deniz and posts from "Blogging Secret" very informative with reference to Adsense related tips (especially for Blogger Beta).
BTW this post is done directly from a nice but nifty Firefox extension called Performancing. I really like their idea/design and concept, especially because I am yet to see my first post from Google Docs appear on my test blog.
Well, I had no new ideas (except for a few which require CSS knowledge) so I have no new hacks of my own as of now. However, this post points to some good hacks/add-ons/template mods that I have seen in the neighborhood recently:
1. Hacked Son of Moto template by Deniz of imessengr.
2. Adsense beside your posts in blogger beta by Deniz of imessengr.
3. Adsense between the posts (adding adsense directly to the beta template) by Loui$$ of Blogging No Secret.
4. Template theme switcher (and tutorial to host Blogger Beta CSS externally) and hacked Blogger templates with this functionality (inbuilt) by PurpleMoggy.
In addition, I have found my interaction with Deniz and posts from "Blogging Secret" very informative with reference to Adsense related tips (especially for Blogger Beta).
BTW this post is done directly from a nice but nifty Firefox extension called Performancing. I really like their idea/design and concept, especially because I am yet to see my first post from Google Docs appear on my test blog.
Tuesday, December 05, 2006
Control your Layout editor’s layout
Hello Readers,
I was going through the stock dots dark template when I came across a section labeled “Page structure tweaks for layout editor wireframe” just before the closing skin tag in the template head. Soon I realized that I can use this section to modify the looks of my layout editor in the following section:
Template > Page Elements > Add and Arrange Page Elements
For those of you who couldn't follow me, here is a visual of what I am referring to:
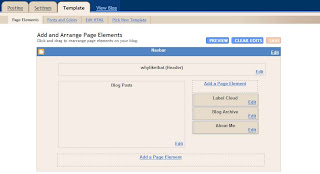
After converting to a three-column layout in my dots dark template, for many months my layout editor was in a mess. This happened because I changed my template’s outer-wrapper width such that there is no wastage of space on a typical 1024x768 resolution screen or in other words I stretched the template to fit snugly :) I did not bother my self with the layout editor and learnt to live with it.
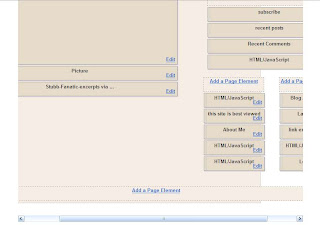
Here’s how my layout editor looked after switching to three columns and then the widebar layout. Call it an example of a bad layout in the layout editor:
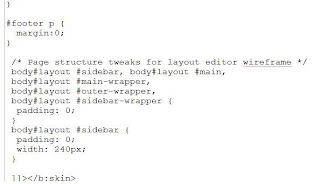
However, after the recent switch to the lighter and more legible dots template, I discovered this section of the template and found out that I can completely control the looks of the layout editor from within the template code. Here’s how the code looks:
Here’s my modified code to get the layout-editor in order:
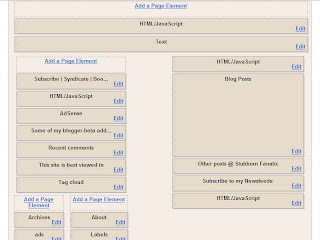
and the result is acceptable:
Just look at the code and follow its syntax and how it’s done. Play around with the width values to get the best fit (in a test blog and with backup on original). Soon you should be able to fix layout editor issues on your own. Remember that you can drop a line here in case some thing goes wrong.
I was going through the stock dots dark template when I came across a section labeled “Page structure tweaks for layout editor wireframe” just before the closing skin tag in the template head. Soon I realized that I can use this section to modify the looks of my layout editor in the following section:
Template > Page Elements > Add and Arrange Page Elements
For those of you who couldn't follow me, here is a visual of what I am referring to:

After converting to a three-column layout in my dots dark template, for many months my layout editor was in a mess. This happened because I changed my template’s outer-wrapper width such that there is no wastage of space on a typical 1024x768 resolution screen or in other words I stretched the template to fit snugly :) I did not bother my self with the layout editor and learnt to live with it.
Here’s how my layout editor looked after switching to three columns and then the widebar layout. Call it an example of a bad layout in the layout editor:

However, after the recent switch to the lighter and more legible dots template, I discovered this section of the template and found out that I can completely control the looks of the layout editor from within the template code. Here’s how the code looks:

Here’s my modified code to get the layout-editor in order:
/* Page structure tweaks for layout editor wireframe */

body#layout #sidebar, body#layout #main,
body#layout #main-wrapper,
body#layout #outer-wrapper,
body#layout #sidebar-wrapper {
  padding: 0;
}

body#layout #outer-wrapper {
  padding: 0;
  width: 765px;
  padding: 0 5px 0 10px;
 }

body#layout #sidebar1-wrapper {
  padding: 0;
  width: 150px;
 }

body#layout #sidebar2-wrapper {
  padding: 0;
  width: 170px;
 }

body#layout #widebar-wrapper {
  width: 290px;
  padding: 5px 10px 0 5px;
 }

body#layout #widebar {
  padding: 0;
  width: 290px;
 }

body#layout #main-wrapper {
  padding: 0;
  width: 360px;
  padding: 5px 10px 0 5px;
 }

body#layout #header-wrapper {
  padding: 0;
  width: 750px;
 }

body#layout #footer-wrapper {
  padding: 0;
  width: 750px;
 }

/* End of Page structure tweaks for layout editor wireframe */
and the result is acceptable:

Just look at the code and follow its syntax and how it’s done. Play around with the width values to get the best fit (in a test blog and with backup on original). Soon you should be able to fix layout editor issues on your own. Remember that you can drop a line here in case some thing goes wrong.
Tuesday, November 28, 2006
Show recent posts under a label (category) in a drop-down from horizontal navigation bar
Dear readers,
Based on the new JSON format and the JavaScript code for displaying recent posts from Hans of beautiful beta, I now present horizontal navigational menus with auto (activates on mouse hover) drop-downs which display the most recent posts under each of your labels (say categories).
To see this in action take your mouse cursor to the "Beta Hack" or "Hack News" section in the navigation bar in my blog's head section (i.e. just below the hidden navbar).
This hack will allow readers to browse a particular label category by simply clicking on the label name in the menu or go directly to a specific post under that label by clicking the post title that appears in the drop-down. Therefore, this does not take away the navigational advantage of horizontal tabs in header and at the same time it allows a blog author(s) to give exposure to the most recently updated posts from various label categories.
I found the code for this drop-down menu on dynamic drive at the following link. (Don’t forget to visit this link to learn more about customizing this code according your preferences.)
Warning : If you are not familiar with your template code and HTML I recommend you create a backup copy of your template and/or first try this hack on a test blog.
The Hack
Here is the procedure for installing this hack in your blog:
1. JavaScript source
Copy-paste this line of code into the <head> section of your template, preferably just before </head>
<!-- /***********************************************
* Chrome CSS Drop Down Menu- © Dynamic Drive DHTML code library (www.dynamicdrive.com)
* This notice MUST stay intact for legal use
* Visit Dynamic Drive at http://www.dynamicdrive.com/ for full source code
***********************************************/ -->
<script src='http://stubb.fanatic.googlepages.com/chrome.js' type='text/javascript'/>
To download this file for modification/alternate hosting, right-click here and save to your hard-drive.
2. Including the CSS
Copy-paste any one of these CSS style codes just before the ]]></b:skin> line in the header section of your template. The images (links in the code) are hosted in my test blog, so if you wish to, you can download the images and host them in your own blog.
CSS style 1: Click here to view/download the code.
CSS style 2: Click here to view/download the code.
CSS style 3: Click here to view/download the code.
CSS style 4: Click here to view/download the code.
3. Code in the HTML widget.
Copy-paste this code into a HTML widget from the page layout section (using add a page element feature). You should ideally create this widget in the top most region of your page (like in my blog).
Click here to view/download the widget code.
Modifications:
- Each drop down menu’s code has been demarcated with indicator comments in <!-- … --> If you wish to add additional drop downs, follow the usual flow of the code i.e. a fourth drop down will have
<li><a href="[label link]" rel="dropmenu4">[label name]</a></li>
in the very first div, and
<!--4th drop down menu -->
<div id="dropmenu4" class="dropmenudiv" style="width: 150px;" >
[the js code for calling the post titles]
</div>
to include the function call for displaying post titles.
- Replace all the […]s with the appropriate text as indicated. For example, replace [Label feed URL] with the feed URL of your label which will be of the following format
http://stubborn-fanatic.blogspot.com/feeds/posts/default/-/[LabelName]
If the label name is not one single word and has got spaces between words, replace the spaces with %20
http://stubborn-fanatic.blogspot.com/feeds/posts/default/-/Label%20Name
- The value of “numposts” which by default equals 5, can be modified but I do not recommend increasing it, as long drop-downs might look ugly.
The hack is now installed. Do let me know if you face any problems.
Update: Alastor from nonstop nonsense (but it makes quite a bit of sense here :)) has used the same code from dynamic drive to convert entire widgets into drop-downs! Please visit his blog to learn how. The "Labels" and "Translate" section in my header navigation bar are using this hack.
Based on the new JSON format and the JavaScript code for displaying recent posts from Hans of beautiful beta, I now present horizontal navigational menus with auto (activates on mouse hover) drop-downs which display the most recent posts under each of your labels (say categories).
To see this in action take your mouse cursor to the "Beta Hack" or "Hack News" section in the navigation bar in my blog's head section (i.e. just below the hidden navbar).
This hack will allow readers to browse a particular label category by simply clicking on the label name in the menu or go directly to a specific post under that label by clicking the post title that appears in the drop-down. Therefore, this does not take away the navigational advantage of horizontal tabs in header and at the same time it allows a blog author(s) to give exposure to the most recently updated posts from various label categories.
I found the code for this drop-down menu on dynamic drive at the following link. (Don’t forget to visit this link to learn more about customizing this code according your preferences.)
Warning : If you are not familiar with your template code and HTML I recommend you create a backup copy of your template and/or first try this hack on a test blog.
The Hack
Here is the procedure for installing this hack in your blog:
1. JavaScript source
Copy-paste this line of code into the <head> section of your template, preferably just before </head>
<!-- /***********************************************
* Chrome CSS Drop Down Menu- © Dynamic Drive DHTML code library (www.dynamicdrive.com)
* This notice MUST stay intact for legal use
* Visit Dynamic Drive at http://www.dynamicdrive.com/ for full source code
***********************************************/ -->
<script src='http://stubb.fanatic.googlepages.com/chrome.js' type='text/javascript'/>
To download this file for modification/alternate hosting, right-click here and save to your hard-drive.
2. Including the CSS
Copy-paste any one of these CSS style codes just before the ]]></b:skin> line in the header section of your template. The images (links in the code) are hosted in my test blog, so if you wish to, you can download the images and host them in your own blog.
CSS style 1: Click here to view/download the code.
CSS style 2: Click here to view/download the code.
CSS style 3: Click here to view/download the code.
CSS style 4: Click here to view/download the code.
3. Code in the HTML widget.
Copy-paste this code into a HTML widget from the page layout section (using add a page element feature). You should ideally create this widget in the top most region of your page (like in my blog).
Click here to view/download the widget code.
Modifications:
- Each drop down menu’s code has been demarcated with indicator comments in <!-- … --> If you wish to add additional drop downs, follow the usual flow of the code i.e. a fourth drop down will have
<li><a href="[label link]" rel="dropmenu4">[label name]</a></li>
in the very first div, and
<!--4th drop down menu -->
<div id="dropmenu4" class="dropmenudiv" style="width: 150px;" >
[the js code for calling the post titles]
</div>
to include the function call for displaying post titles.
- Replace all the […]s with the appropriate text as indicated. For example, replace [Label feed URL] with the feed URL of your label which will be of the following format
http://stubborn-fanatic.blogspot.com/feeds/posts/default/-/[LabelName]
If the label name is not one single word and has got spaces between words, replace the spaces with %20
http://stubborn-fanatic.blogspot.com/feeds/posts/default/-/Label%20Name
- The value of “numposts” which by default equals 5, can be modified but I do not recommend increasing it, as long drop-downs might look ugly.
The hack is now installed. Do let me know if you face any problems.
Update: Alastor from nonstop nonsense (but it makes quite a bit of sense here :)) has used the same code from dynamic drive to convert entire widgets into drop-downs! Please visit his blog to learn how. The "Labels" and "Translate" section in my header navigation bar are using this hack.
Sunday, November 26, 2006
Allow your labels to be searched in Technorati and Del.icio.us tags
Hello Friends,
I have developed a simple little add-on for your blog. To know what I am talking about, just see the labels in my post's footer. Notice the tiny Technorati pic beside each label. When clicked, it shows you all the posts from bloggosphere that have been tagged with the label in question. (See end of this post for Del.icio.us how-to)
It is a good way to allow your reader to search Technorati using tags and serves as a sort of "related posts from other blogs" link. Installing this code is fairly simple. Just follow these steps:
1. Edit your template HTML code and check the "Expand Widget Templates" box. Make a backup of your template if you are not used editing HTML.
2. Look for your post footer i.e. look for <div class='post-footer'>
3. Then in there, look for the labels code i.e. look for <span class='post-labels'>
4. In there, look for the main label href i.e. look for:
<a expr:href='data:label.url' rel='tag'><data:label.name/></a>
and immediately after that line add this code:
That's it! It's as simple as that. However, let me know if your face any problems.
Update: Del.icio.us How-to:
Deniz from imessengr.com has added the "search in Del.icio.us tags" functionality to labels, on similar lines. You can access the code from here.
Technorati Tags: blogger, technorati tags, blogger add-on
I have developed a simple little add-on for your blog. To know what I am talking about, just see the labels in my post's footer. Notice the tiny Technorati pic beside each label. When clicked, it shows you all the posts from bloggosphere that have been tagged with the label in question. (See end of this post for Del.icio.us how-to)
It is a good way to allow your reader to search Technorati using tags and serves as a sort of "related posts from other blogs" link. Installing this code is fairly simple. Just follow these steps:
1. Edit your template HTML code and check the "Expand Widget Templates" box. Make a backup of your template if you are not used editing HTML.
2. Look for your post footer i.e. look for <div class='post-footer'>
3. Then in there, look for the labels code i.e. look for <span class='post-labels'>
4. In there, look for the main label href i.e. look for:
<a expr:href='data:label.url' rel='tag'><data:label.name/></a>
and immediately after that line add this code:
<a expr:href='"http://technorati.com/tag/" + data:label.name' rel='tag' target='_blank' title='Search this tag on Technorati'/><img alt='' border='0' src='http://photos1.blogger.com/x/blogger2/178/17688294081221/320/25365/technorati.gif' style='vertical-align:middle'/></a>
That's it! It's as simple as that. However, let me know if your face any problems.
Update: Del.icio.us How-to:
Deniz from imessengr.com has added the "search in Del.icio.us tags" functionality to labels, on similar lines. You can access the code from here.
Technorati Tags: blogger, technorati tags, blogger add-on
Saturday, November 25, 2006
What's with the backlinks?
On recently published posts across all blogs I am seeing similar backlinks pointing to some page2rss thingy. The mess of links in there, led me here.

What's up with Blogger? What new feature or bug is this? :D
Technorati Tags: blogger search, blogger, backlinks

What's up with Blogger? What new feature or bug is this? :D
Technorati Tags: blogger search, blogger, backlinks
Friday, November 24, 2006
JSON, customizable widgets and other applications
Hello Readers,
There is some really good stuff happening in the Blogger hacking world. This comes after the recent announcement on Blogger buzz regarding Blogger (or I can say all of Google) moving to JSON (JavaScript Object Notification) data format for feeds.
The hacks I am referring to are:
1. Hoctro's Recent Comments/Posts widget.
2. Ramani's Customizable Recent Comments Widget.
3. Hans's Customizable Recent Comments Widget with date and post title (offered in one-click widget install feature).
And this is not it, Stephen from Singpolyma-tech has announced an upgrade for his popular hack - Peek-a-boo comments on main page. All this is really good stuff!
Technorati Tags: JSON, Beta_hacks
There is some really good stuff happening in the Blogger hacking world. This comes after the recent announcement on Blogger buzz regarding Blogger (or I can say all of Google) moving to JSON (JavaScript Object Notification) data format for feeds.
The hacks I am referring to are:
1. Hoctro's Recent Comments/Posts widget.
2. Ramani's Customizable Recent Comments Widget.
3. Hans's Customizable Recent Comments Widget with date and post title (offered in one-click widget install feature).
And this is not it, Stephen from Singpolyma-tech has announced an upgrade for his popular hack - Peek-a-boo comments on main page. All this is really good stuff!
Technorati Tags: JSON, Beta_hacks
Tuesday, November 21, 2006
Cool Technorati Add-ons for your Blog
Hello Readers,
I have come across two cool add-ons for your blog. They are:
1. Technorati Rank display widget by purplemoggy
2. Technorati Blog reactions link from imessengr.com
1. PurpleMoggy has posted a very useful add-on with which one can display their real-time Technorati rank in the blog's sidebar. To get a preview of the add-on and learn the code click here.
2. Deniz from imessengr.com has provided the Blogger Beta code for displaying the number of links from other blogs to a particular post via Technorati's engine. To get a preview of this add-on and learn the code click here.
I have come across two cool add-ons for your blog. They are:
1. Technorati Rank display widget by purplemoggy
2. Technorati Blog reactions link from imessengr.com
1. PurpleMoggy has posted a very useful add-on with which one can display their real-time Technorati rank in the blog's sidebar. To get a preview of the add-on and learn the code click here.
2. Deniz from imessengr.com has provided the Blogger Beta code for displaying the number of links from other blogs to a particular post via Technorati's engine. To get a preview of this add-on and learn the code click here.
Friday, November 17, 2006
New hacked template for Blogger beta and return of "flag-blog"
Dears readers,
The topics covered in this post are:
1. A hacked sand-dollar template (with widebar) for blogger beta by imessengr.com
2. "Flag blog" option now available for Blogger beta blogs.
1. Hacked Sand Dollar Template
Deniz from imessengr.com (the one who presented the recent referrers hack for blogger beta) has released a hacked sand dollar template for blogger beta. This template contains a variety of hacks and is based on the widebar design I had discussed earlier in my posts. You can preview this template from here and view this post to learn more and download the template.
2. "Flag Blog" option now available for Blogger beta blogs.

I just noticed that the "flag blog" or "flag this" button on the navbar which was available only for the classic Blogger blogs in now available for Blogger Beta blogs as well. With this, blogger has brought yet another feature of Blogger v2.0 into beta i.e. v3.0.
The topics covered in this post are:
1. A hacked sand-dollar template (with widebar) for blogger beta by imessengr.com
2. "Flag blog" option now available for Blogger beta blogs.
1. Hacked Sand Dollar Template
Deniz from imessengr.com (the one who presented the recent referrers hack for blogger beta) has released a hacked sand dollar template for blogger beta. This template contains a variety of hacks and is based on the widebar design I had discussed earlier in my posts. You can preview this template from here and view this post to learn more and download the template.
2. "Flag Blog" option now available for Blogger beta blogs.
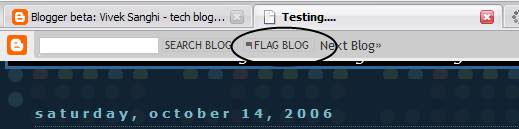
I just noticed that the "flag blog" or "flag this" button on the navbar which was available only for the classic Blogger blogs in now available for Blogger Beta blogs as well. With this, blogger has brought yet another feature of Blogger v2.0 into beta i.e. v3.0.
Monday, November 13, 2006
Feed, Social Bookmark Drop-down and a Recent referrers hack
Hello Readers,
In this post, I have presented the following add-on for Blogger-Beta:
1. Subscribe drop-down (on-hover) for presenting feed subscription options.
2. Social Bookmark drop-down for Blogger-beta post footers.
3. Extreme Socializer – A Social Bookmarking alternative.
4. Recent Referrers hack by web-messenger.
1. Feed Subscribe Drop-down (on-hover)
You might have noticed the Javascript-based subscribe drop-down (activates on mouse hover) in my blog’s widebar. I had got this one from here. Just go to this link, follow the instructions there in, incorporate the code in a widget and say good-bye to that long list of chicklets occupying your sidebar and also present your reader with a large number of subscription options.
2. Social Bookmark Drop-down
From the same site I also found a tool to create a Social Bookmark drop-down menu (regular type). As this tool cannot create the links for Blogger beta post footers, I have modified their code and put it up for ready use (Thanks to Ramani for the help). You can download the text file containing this code from here. Simply download the text file and copy-paste the code directly into the post-footer portion of your template. See this add-on in action, here.(To learn how to work with post-footers in blogger beta, click here)
The advantage of this system is that you can give your readers the option of choosing from a large number of social bookmarking services without:
1. Sacrificing much space in your post footers.
2. Taking pains to host the social bookmarking icons (images) and then linking to them in your code.
3. Increasing your blog loading time by having a lot of images in the post footer.
In addition, inspite of the large list of bookmarking services in this drop-down, your readers should be able to locate a service (of their choice) easily as the list is in an alphabetical order. If you want to add more services to this drop-down you can look-up for them here and for an exhaustive list, go here (you may need to modify to code for blogger beta).
3. Social Bookmarking alternatives
Another good alternative to present a large number of bookmarking options to your readers without much trouble, is to use Extreme Socializer. Once a reader clicks on the Extreme Socializer icon, they are taken to the Extreme Socializer website where they can choose from a large number of bookmarking services.
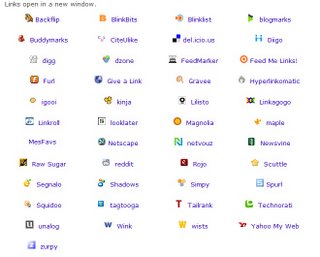
Here is the code to be used in post-footers, if you want to use this service:
<a expr:href='"http://ekstreme.com/socializer/?url=" + data:post.url + "&title=" + data:post.title' target='_blank' title='Bookmark anywhere with Extreme Socializer'><img alt='Socialize' border='0' src='[Your image source]'/></a>
You can pick the image for this one from blog’s my post-footer, but please host it on your own :)
Added on Nov 29, 2006: Deniz from imessengr.com has found another good service that offers a range of bookmarking, feed/podcast aggregating options. Please visit his blog to learn about the service and get the code for your blogs.
4. Recent referrers hack
Deniz from web-messengers has presented a hack on how to show a list of recent referrers to your post. You can check-out this hack from here.
In this post, I have presented the following add-on for Blogger-Beta:
1. Subscribe drop-down (on-hover) for presenting feed subscription options.
2. Social Bookmark drop-down for Blogger-beta post footers.
3. Extreme Socializer – A Social Bookmarking alternative.
4. Recent Referrers hack by web-messenger.
1. Feed Subscribe Drop-down (on-hover)
You might have noticed the Javascript-based subscribe drop-down (activates on mouse hover) in my blog’s widebar. I had got this one from here. Just go to this link, follow the instructions there in, incorporate the code in a widget and say good-bye to that long list of chicklets occupying your sidebar and also present your reader with a large number of subscription options.
2. Social Bookmark Drop-down
From the same site I also found a tool to create a Social Bookmark drop-down menu (regular type). As this tool cannot create the links for Blogger beta post footers, I have modified their code and put it up for ready use (Thanks to Ramani for the help). You can download the text file containing this code from here. Simply download the text file and copy-paste the code directly into the post-footer portion of your template. See this add-on in action, here.(To learn how to work with post-footers in blogger beta, click here)
The advantage of this system is that you can give your readers the option of choosing from a large number of social bookmarking services without:
1. Sacrificing much space in your post footers.
2. Taking pains to host the social bookmarking icons (images) and then linking to them in your code.
3. Increasing your blog loading time by having a lot of images in the post footer.
In addition, inspite of the large list of bookmarking services in this drop-down, your readers should be able to locate a service (of their choice) easily as the list is in an alphabetical order. If you want to add more services to this drop-down you can look-up for them here and for an exhaustive list, go here (you may need to modify to code for blogger beta).
3. Social Bookmarking alternatives
Another good alternative to present a large number of bookmarking options to your readers without much trouble, is to use Extreme Socializer. Once a reader clicks on the Extreme Socializer icon, they are taken to the Extreme Socializer website where they can choose from a large number of bookmarking services.
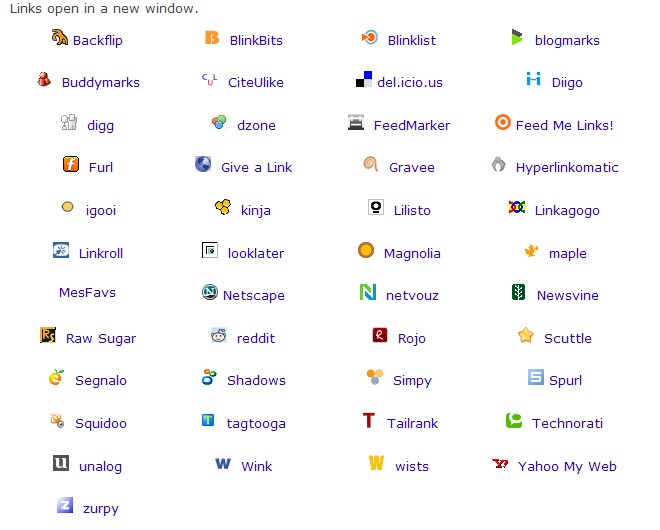
Here is the code to be used in post-footers, if you want to use this service:
<a expr:href='"http://ekstreme.com/socializer/?url=" + data:post.url + "&title=" + data:post.title' target='_blank' title='Bookmark anywhere with Extreme Socializer'><img alt='Socialize' border='0' src='[Your image source]'/></a>
You can pick the image for this one from blog’s my post-footer, but please host it on your own :)
Added on Nov 29, 2006: Deniz from imessengr.com has found another good service that offers a range of bookmarking, feed/podcast aggregating options. Please visit his blog to learn about the service and get the code for your blogs.
4. Recent referrers hack
Deniz from web-messengers has presented a hack on how to show a list of recent referrers to your post. You can check-out this hack from here.
Subscribe to:
Posts (Atom)
Subscribe to my Newsfeeds:


This work is licensed under a
Creative Commons Attribution-ShareAlike 2.5 License.
Note: The author is not responsible for any loss of data or damages to your homepage as a result of using the hacks suggested here. Please observe all necessary precautions while modifying template code.
© 2006 Vivek Sanghi a.k.a Stubborn-Fanatic